产学实验1:利用modelarts手势识别注意事项
·
产学实验1:利用modelarts手势识别注意事项
1.首先利用python脚本更改“gesture_recognition_data”
labels = ["Background", "Great", "OK", "Other", "Rock", "Yeah"]

import os
import glob
import codecs

# 定义标签及其对应的序号
labels_map = {
    "Background": 0,
    "Great": 1,
    "OK": 2,
    "Other": 3,
    "Rock": 4,
    "Yeah": 5
}


files_path = "E:\ModelArts_test\dataset\gesture_recognition_data\gesture-data"

# 获取所有 .txt 文件
label_files = glob.glob(os.path.join(files_path, '*.txt'))
jpg_files = {os.path.splitext(os.path.basename(f))[0]: f for f in glob.glob(os.path.join(files_path, '*.jpg'))}
png_files = {os.path.splitext(os.path.basename(f))[0]: f for f in glob.glob(os.path.join(files_path, '*.png'))}


for file_path in label_files:
    with codecs.open(file_path, 'r', 'utf-8') as f:
        line = f.readline()
        file_name = os.path.splitext(os.path.basename(file_path))[0]
        index = labels_map[line]
        if file_name in jpg_files:
            img_ext = '.jpg'
            img_path = jpg_files[file_name]
        elif file_name in png_files:
            img_ext = '.png'
            img_path = png_files[file_name]
        else:
            print(f"No corresponding image file found for {file_name}")
            continue
        line = line.replace(line,f"{file_name}"+img_ext+f",{index}")
        f.close()
    with codecs.open(file_path, 'w', 'utf-8') as f:
        f.write(line)
        f.close()


print("修改完成了")
(注意修改第18行的代码中files_path的路径为本机中手势识别数据集存放的路径)
运行结束后查看数据集中的.txt结尾的文件,如果为修改成了下图的样式,则证明修改成功!!!

修改后重新压缩,并进行上传到obs在进一步上传到Notebook后进行解压。
最好先创建一个文件夹后,把压缩的文件上传到文件夹下后再解压
2.将code.zip下载,上传至obs
code.zip下载连接在:【免费】tensorflow手势识别源代码压缩包资源-CSDN文库
url:https://download.csdn.net/download/savage2113/89933349
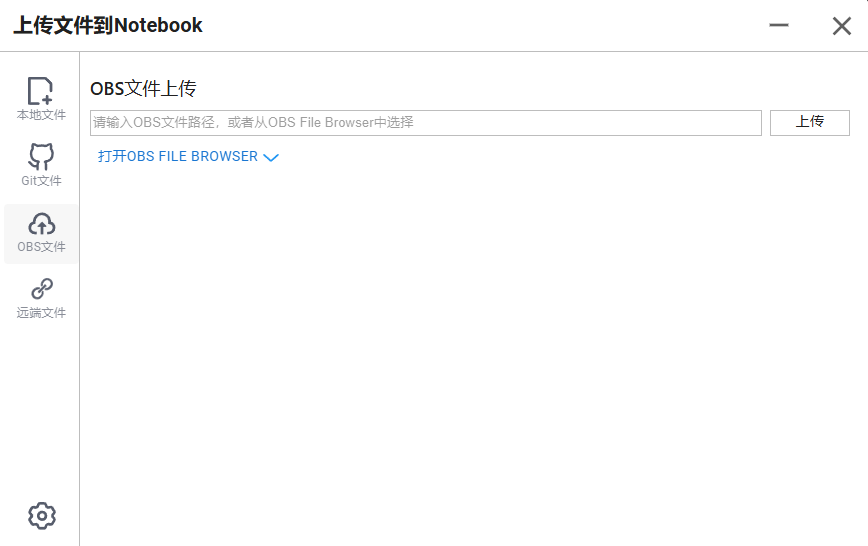
进入Notebook的终端,找到.zip文件夹输入unzip code.zip
3.运行脚本进行训练
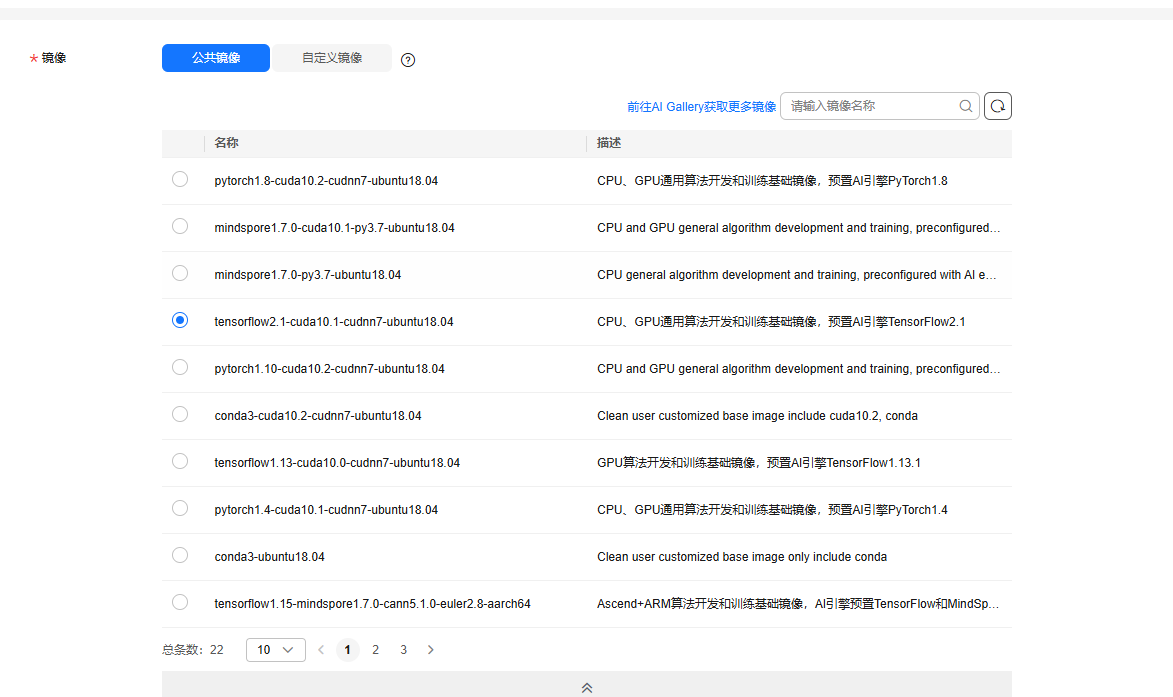
(1)选择Notebook中的镜像
按照下图选择即可
(2)下载必要的包
在终端输入**pip install keras==2.3.1**下载必要的包
(3)运行脚本
使用cd命令进入code的文件夹下,使用命令
python run.py --data_url=你的数据集的路径 --train_url=保存的模型的路径 --num_class=6 --max_epochs=10
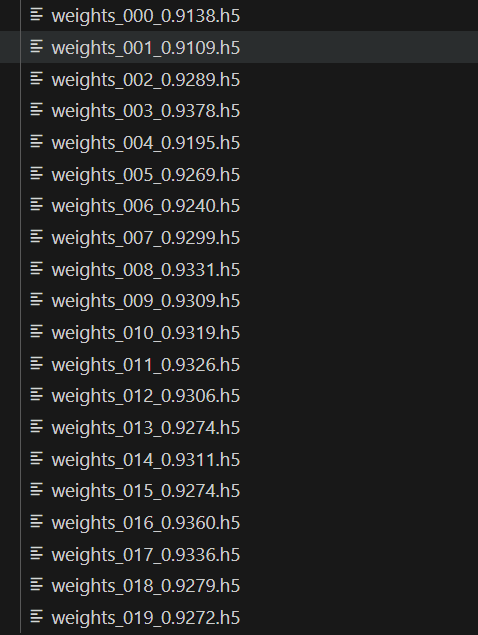
(4)下载权重文件
找到你选择的保存模型的路径下载如下图的权重文件,选择其中正确率最高的一个右键Download即可。
4.使用脚本实现摄像头动态捕捉并输出预测结果
(1)下载必要的包
使用如下命令下载:
- pip install tensorflow==2.11.0
- pip install keras==2.3.1
- pip install opencv-python
运行下面python代码:
import cv2
import numpy as np
import tensorflow as tf
from tensorflow.keras.layers import Flatten, Dense
from tensorflow.keras.applications.resnet50 import ResNet50, preprocess_input
from tensorflow.keras.models import Model
from contextlib import contextmanager
import threading
import queue
import time
# 捕获摄像头图像
def capture_image(cap,q):
    while True:
        if not cap.isOpened():
            print("没有打开摄像头")
            return None
        ret, frame = cap.read()
        if not ret:
            print("无法读取帧")
            return None
        cv2.imshow("Gesture Recognition",frame)
        if(q.qsize() == 0):
            q.put(frame)
        else:
            pass
        if cv2.waitKey(1) & 0xFF == ord('q'):
            break


# 预处理图像
def preprocess_image(image):
    # 调整图像大小为 (224, 224)
    image = cv2.resize(image, (224, 224))
    # 将 BGR 图像转换为 RGB 图像
    image = cv2.cvtColor(image, cv2.COLOR_BGR2RGB)
    # 转换为浮点数并进行预处理
    image = np.expand_dims(image, axis=0)
    image = preprocess_input(image)
    return image


#定义模型
def model_fn():

    # tensor = Input(shape=(224,224,3))
    """
    pre-trained resnet50 model
    """
    base_model = ResNet50(weights=None,
                          include_top=False,
                          input_shape=(224,224,3),
                          classes=6,
                          )
    # base_model.summary()
    # base_model.load_weights('/home/ma-user/work/code/models"
    # +"/resnet50_weights_tf_dim_ordering_tf_kernels.h5',by_name=True, skip_mismatch=True)
    for layer in base_model.layers:
        layer.trainable = False
    x = base_model.output
    x = Flatten()(x)
    predictions = Dense(6, activation='softmax')(x)
    model = Model(inputs=base_model.input, outputs=predictions)
    return model
# 加载预训练的 ResNet50 模型并加载本地权重
def load_model(weights_path):
    model = model_fn()
    model.load_weights(weights_path)
    return model

# 进行预测
def predict_image(model,q):
    while True:
        image=q.get()
        image =preprocess_image(image)
        time.sleep(1)
        if image is None:  # 如果队列中放入的是 None,则停止循环
            break
        labels = ["Background", "Great", "OK", "Other", "Rock", "Yeah"]
        predictions = model.predict(image)
        predict_index = np.argmax(predictions)
        score = np.max(predictions)
        print(f" 预测结果为:{labels[predict_index]},分数为:({score:.2f})")


# 主函数
def main():
    # 打开摄像头
    cap = cv2.VideoCapture(0)  # 0 表示默认摄像头
    with to_device('cpu'):
        q = queue.Queue(maxsize=1)


        # 加载模型和权重
        weights_path = r'E:\\baseLineTest\\weights_003_0.9378.h5'
        model = load_model(weights_path)
        print("加载模型成功!!!!")
        print("按q建推出")

        # # 捕获图像
        # image = q.get()
        # # 预处理图像
        # processed_image = preprocess_image(image)

        # 创建捕获线程
        capture_thread = threading.Thread(target=capture_image, args=(cap, q))
        capture_thread.start()

        # 创建预测线程
        predict_thread = threading.Thread(target=predict_image, args=(model, q))
        predict_thread.start()

        capture_thread.join()

        # 清理资源
        q.put(None)  # 向队列中放入 None 信号,让捕获线程退出
        predict_thread.join()
        cap.release()


        # 进行预测
        # predict_index,score = predict_image(model, processed_image)
        #
        # # 打印预测结果


        # 显示图像


@contextmanager
def to_device(device_type='auto'):
    try:
        """
        创建一个上下文管理器,根据指定的设备类型选择计算设备。

        参数:
        - device_type: str, 设备类型。可选值为 'auto', 'gpu', 'cpu'。
                       'auto': 自动选择设备,优先选择 GPU。
                       'gpu': 强制使用 GPU。
                       'cpu': 强制使用 CPU。
        """
        if device_type == 'auto':
            # 自动选择设备,优先选择 GPU
            if tf.config.list_physical_devices('GPU'):
                device_name = '/GPU:0'
                print("当前设备有GPU,已使用cuda加速")
            else:
                device_name = '/CPU:0'
                print("当前设备没有GPU,已使用默认CPU,运行时间较长!!")
        elif device_type == 'gpu':
            # 强制使用 GPU
            if tf.config.list_physical_devices('GPU'):
                device_name = '/GPU:0'
            else:
                raise RuntimeError("No GPU available, but 'gpu' was requested.")
        elif device_type == 'cpu':
            if tf.config.list_physical_devices('CPU'):
                device_name = '/CPU:0'
            else:
                raise RuntimeError("No CPU available, but 'cpu' was requested.")
        yield
    finally:
        print("_____________________________________________________________________")

if __name__ == "__main__":
    main()
注意:修改第95行为自己下载的训练好的权重文件的路径
到此,结束!!!!

昇腾计算产业是基于昇腾系列(HUAWEI Ascend)处理器和基础软件构建的全栈 AI计算基础设施、行业应用及服务,https://devpress.csdn.net/organization/setting/general/146749包括昇腾系列处理器、系列硬件、CANN、AI计算框架、应用使能、开发工具链、管理运维工具、行业应用及服务等全产业链
更多推荐

 35
35 0
0- 0


 已为社区贡献1条内容

所有评论(0)