【昇腾】Ascend算子开发
Device侧
1. 存储API
1.1 GlobalTensor

1.2 LocalTensor
可获取、设置值、获取大小。页可以通过
[]获取

1.3 数据类型

2. Add样例
- 数据搬入:DataCopy
- 调用计算接口:Add
- 数据搬出:LocalTensor、EnQue、DeQue


2.1 核函数定义
x、y输入,z输出

2.2 算子类

2.3 初始化
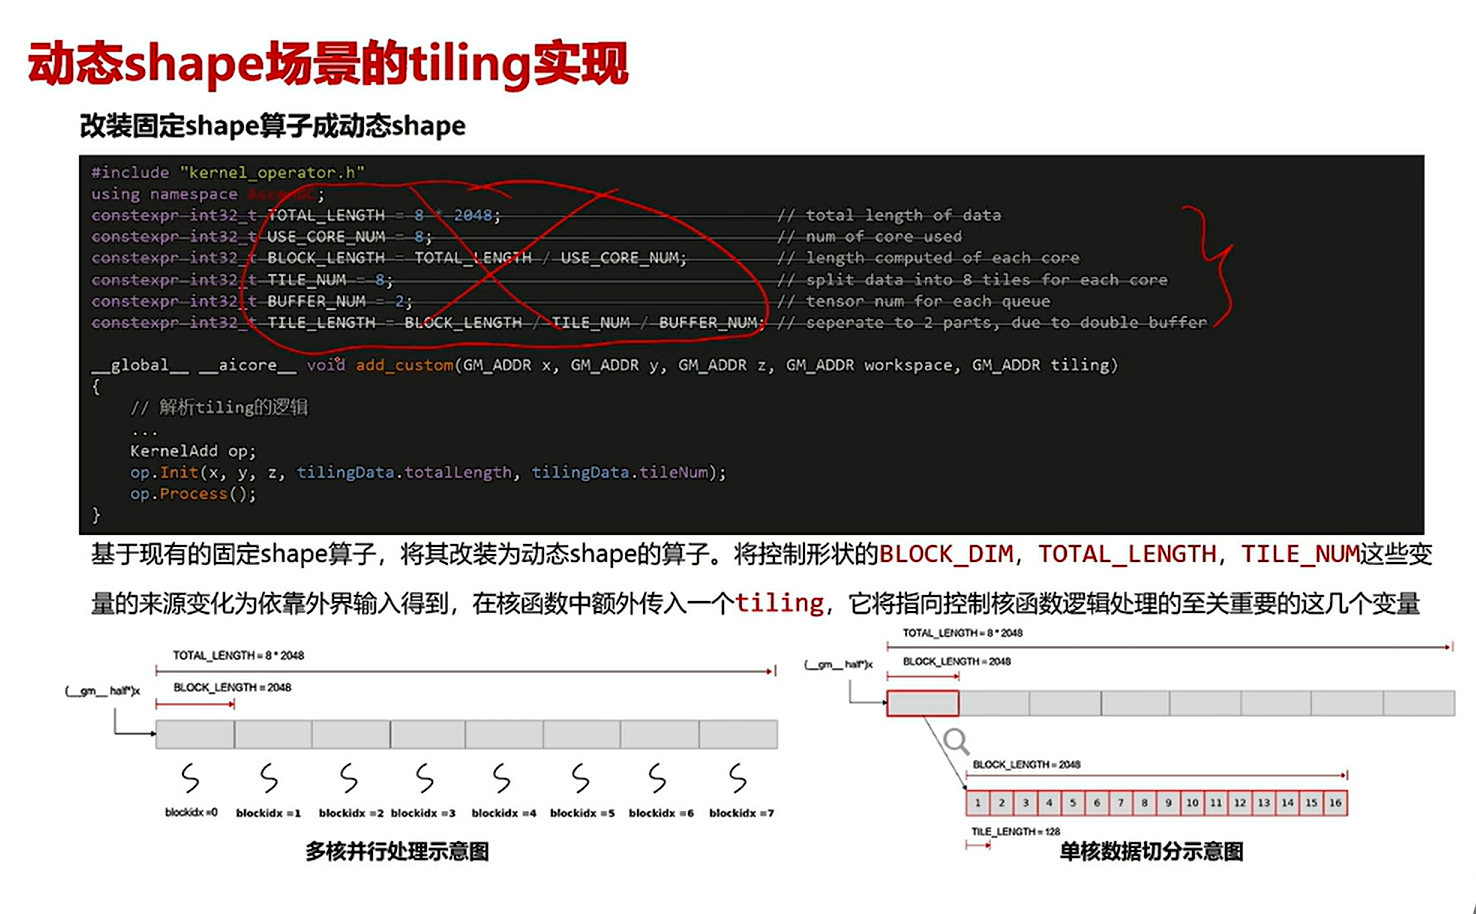
- 根据数据长度为每个核分配需要处理的数据长度
- 单个核处理的数据地址:数据首地址+核序号idx
✖️每个核处理的数据长度- 单核处理
2048个数,再切成16块,每块128个数据,每次处理一个块
- 一条指令的计算尺寸有限,通常256个字节(B),一个
half=16bit=2B,即一条指令能计算128个元素。- 所以进行切分,16块

2.4

3. 编程范式
3.1 核间SPMD
每一个核都会运行一份相同的核程序,只是处理的数据不一样
也就是程序复制到多个核,并行去处理
每个AiCore可以通过GetBlockIdx()获取block_idx

3.2 核内 流水任务

4. 代码
#include <iostream>
#include "kernel_operator.h"
using namespace AscendC;

int main() {
    std::cout << "Hello, World!" << std::endl;
    return 0;
}

extern "C" __global__ __aicore__ void add_custom(__gm__ uint8_t* x , __gm__ uint8_t* y, __gm__ uint8_t* z)
{


}
// 数据总长度
constexpr int32_t TOTAL_LENGTH= 8 * 2048;
// 内核数量
constexpr int32_t USE_COER_NUM = 8;
// 每个核处理的数据长度
constexpr int32_t BLOCK_LENGTH = TOTAL_LENGTH / USE_COER_NUM;
// 送入aicore的数据,又分为8块
constexpr int32_t TILE_NUM = 8;
// 每个队列的张量num, 缓冲区数量?
constexpr int32_t BUFFER_NUM = 2;
// 单个核切分的数据之后,每次处理的数据大小。
// 2048 / 8 / 2 = 128
constexpr int32_t TILE_LENGTH = BLOCK_LENGTH / TILE_NUM / BUFFER_NUM;


class KernelAdd {
public:
    __aicore__ inline KernelAdd(){}
    __aicore__ inline void Init(__gm__ uint8_t* x, __gm__ uint8_t* y, __gm__ uint8_t* z){
//      Host侧内存申请
        xGm.SetGlobalBuffer((__gm__ half *) x + BLOCK_LENGTH * GetBlockIdx(),BLOCK_LENGTH);
        yGm.SetGlobalBuffer((__gm__ half *) y + BLOCK_LENGTH * GetBlockIdx(), BLOCK_LENGTH)
        zGm.SetGlobalBuffer((__gm__ half *) z + BLOCK_LENGTH * GetBlockIdx(), BLOCK_LENGTH)
//       注册队列大小
        pipe.InitBuffer(inQueueX,BUFFER_NUM,TILE_LENGTH * sizeof(half))
        pipe.InitBuffer(inQueueY,BUFFER_NUM,TILE_LENGTH * sizeof(half))
        pipe.InitBuffer(inQueueZ,BUFFER_NUM,TILE_LENGTH * sizeof(half))
    }
    __aicore__ inline void Process(){
//        单个核内,数据分块的数量 = 8*2=16
        constexpr int32_t loopCount = TILE_NUM * BUFFER_NUM;
        for(int32_t i = 0, i< loopCount;i ++)
        {
            CopyIn(i);
            Compute(i);
            CopyOut(i);
        }

    }


private:
//    数据拷贝到 Device
    __aicore__ inline void CopyIn(int32_t progress){
//        在入队列中申请空间,LocalTensor
        LocalTensor<half> xLocal = inQueueX.AllocTensor<half>();
        LocalTensor<half> yLocal = inQueueY.AllocTensor<half>();
//        数据拷贝
        DataCopy(xLocal, xGm[progress * TILE_LENGTH], TILE_LENGTH)
        DataCopy(yLocal, yGm[progress * TILE_LENGTH], TILE_LENGTH)
//        入待处理队列
        inQueueX.enQue(xLocal);
        inQueueY.enQue(yLocal);
    }

    __aicore__ inline void Compute(int32_t progress){
//        从队列中取出数据
        LocalTensor<half> xLocal = inQueueX.DeQue<half>();
        LocalTensor<half> yLocal = inQueueY.DeQue<half>();
//        在出队列中申请空间
        LOcalTensor<half> zLocal = outQueuez.AllocTensor<half>();
//        执行计算
        Add(zLocal, xLocal, yLocal, TILE_LENGTH);
//        结果入队列
        outQueueZ.EnQue(zLocal);
//        释放内存
        inQueueX.FreeTensor(xLocal);
        inQueueY.FreeTensor(yLocal);
    }
    __aicore__ inline void CopyOut(int32_t progress){
//        取出数据
        LocalTensor<half> zLocal = outQueueZ.DeQue<half>();
//        数据从Device拷贝到Host
        DataCopy(zGm[progress * TILE_LENGTH], zLocal, TILE_LENGTH);

        outQueueZ.FreeTensor(zLocal);
    }

private:
    TPipe pipe;
    TQue<QuePosition::VECIN, BUFFER_NUM> inQueueX,inQueueY;
    TQue<QuePosition:VECOUT, BUFFER_NUM> outQueueZ;
    GlobalTensor<half> xGm,yGm,zGm;
};
Host侧
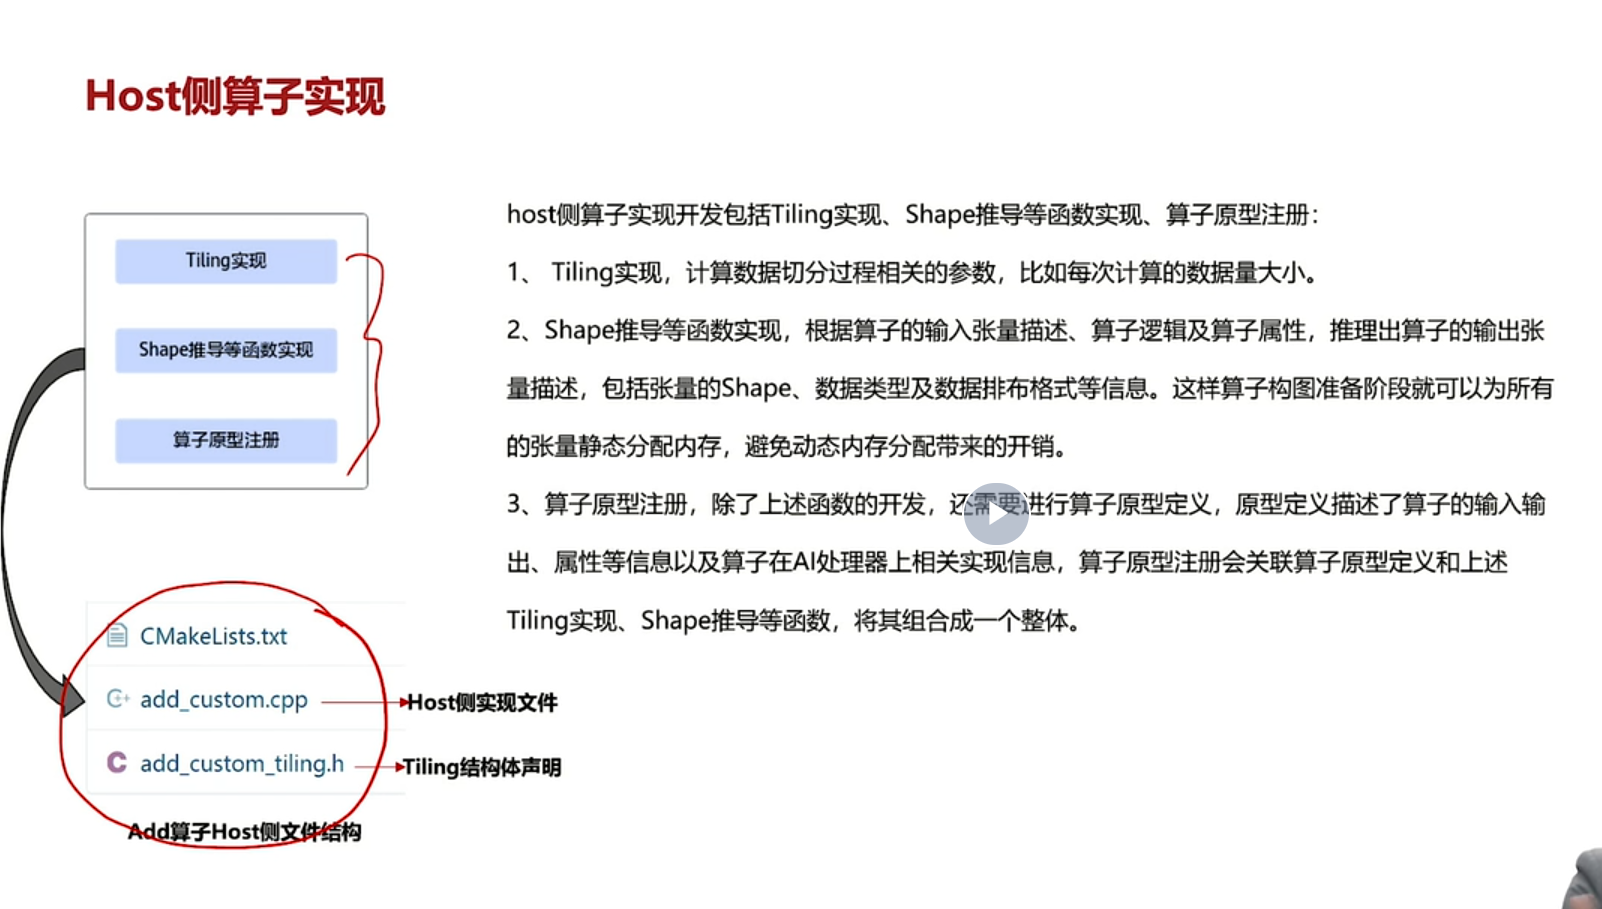
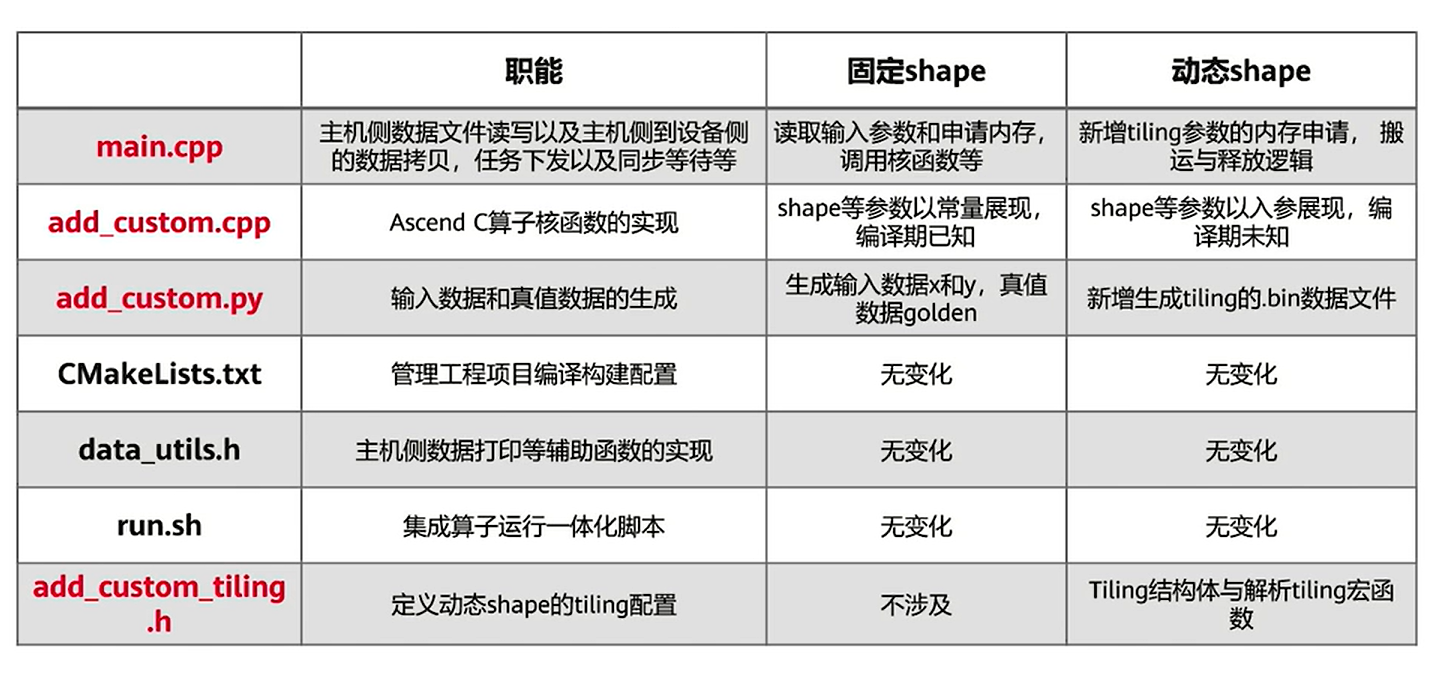
1. Tiling
虽然数据是平均分到每个核上去计算的。但是,由于核内的空间较小,已经平均的数据仍不能存储下去。
所以需要在切分、分块。这个过程是:Tiling实现
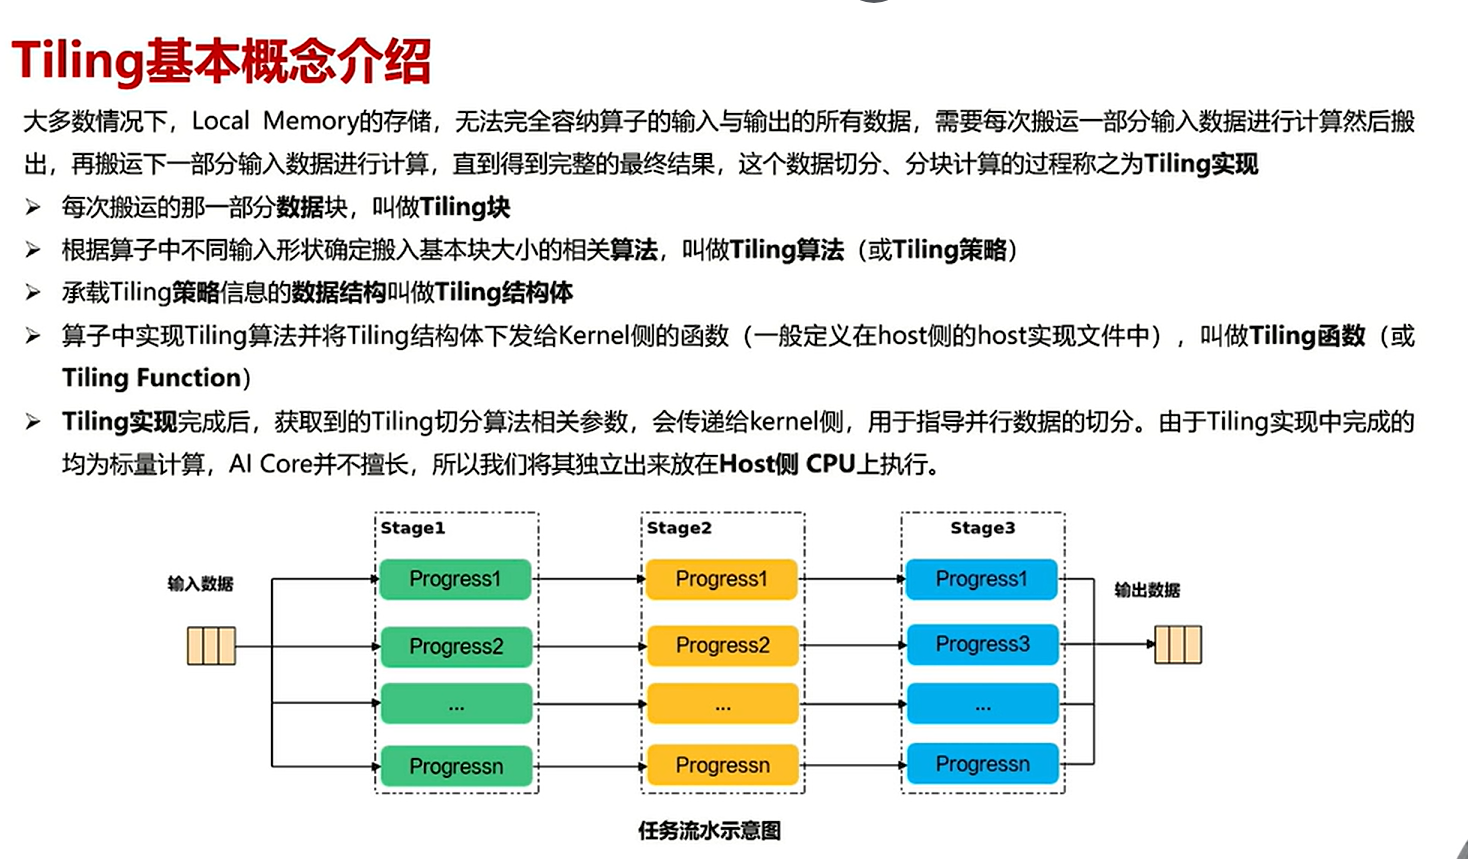
1.1 定义、使用
需要定义一个配置的结构体。 这个结构体单独放到一个文件中:
add_custom_tiling.h
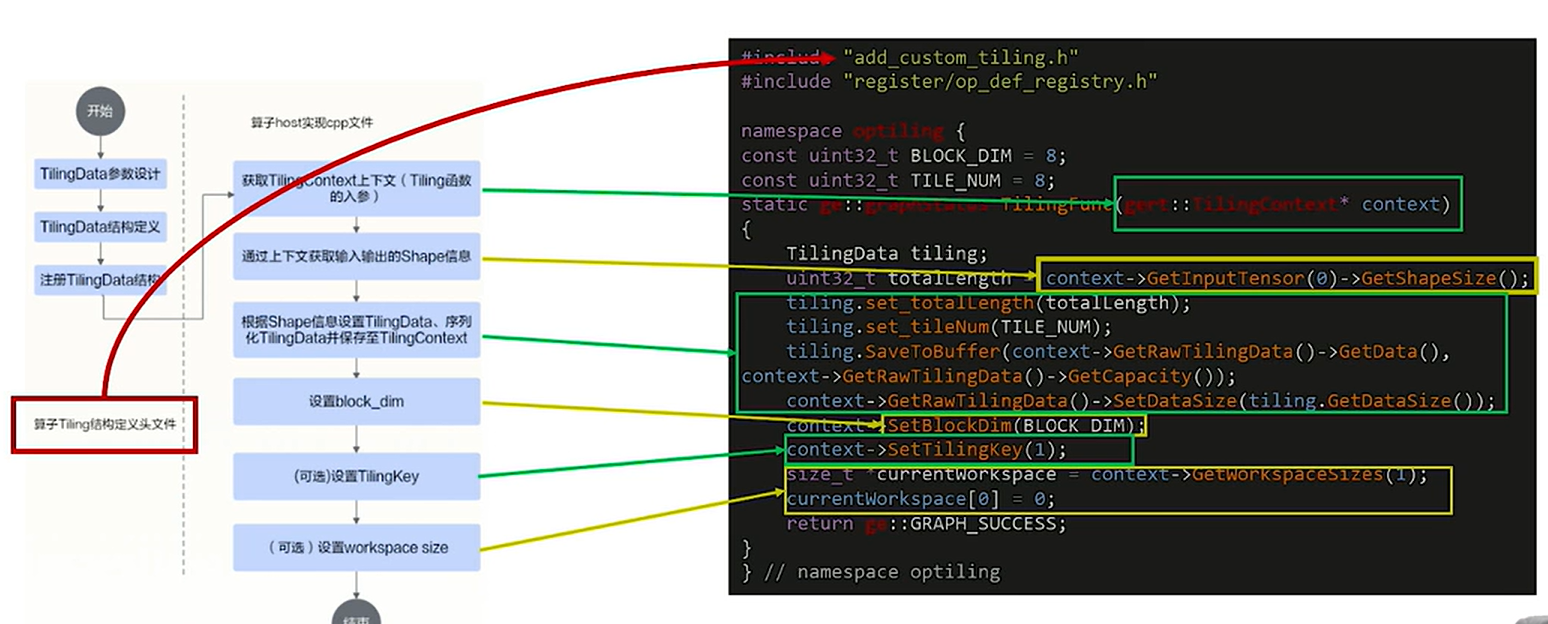
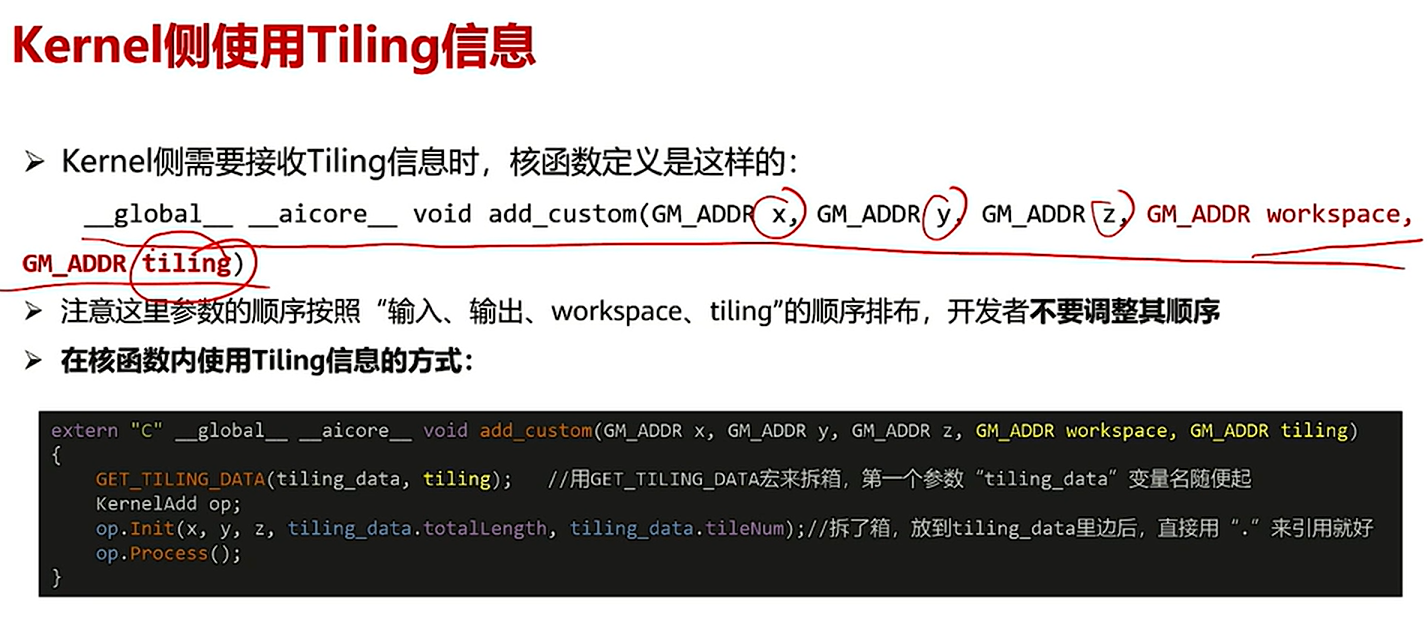
改变的一些代码
#ifndef ADD_CUSTOM_TILING_H
#define ADD_CUSTOM_TILING_H
#include <cstdint>

struct AddCustomTilingData {
    uint32_t totalLength;
    uint32_t tileNum;
};
#endif
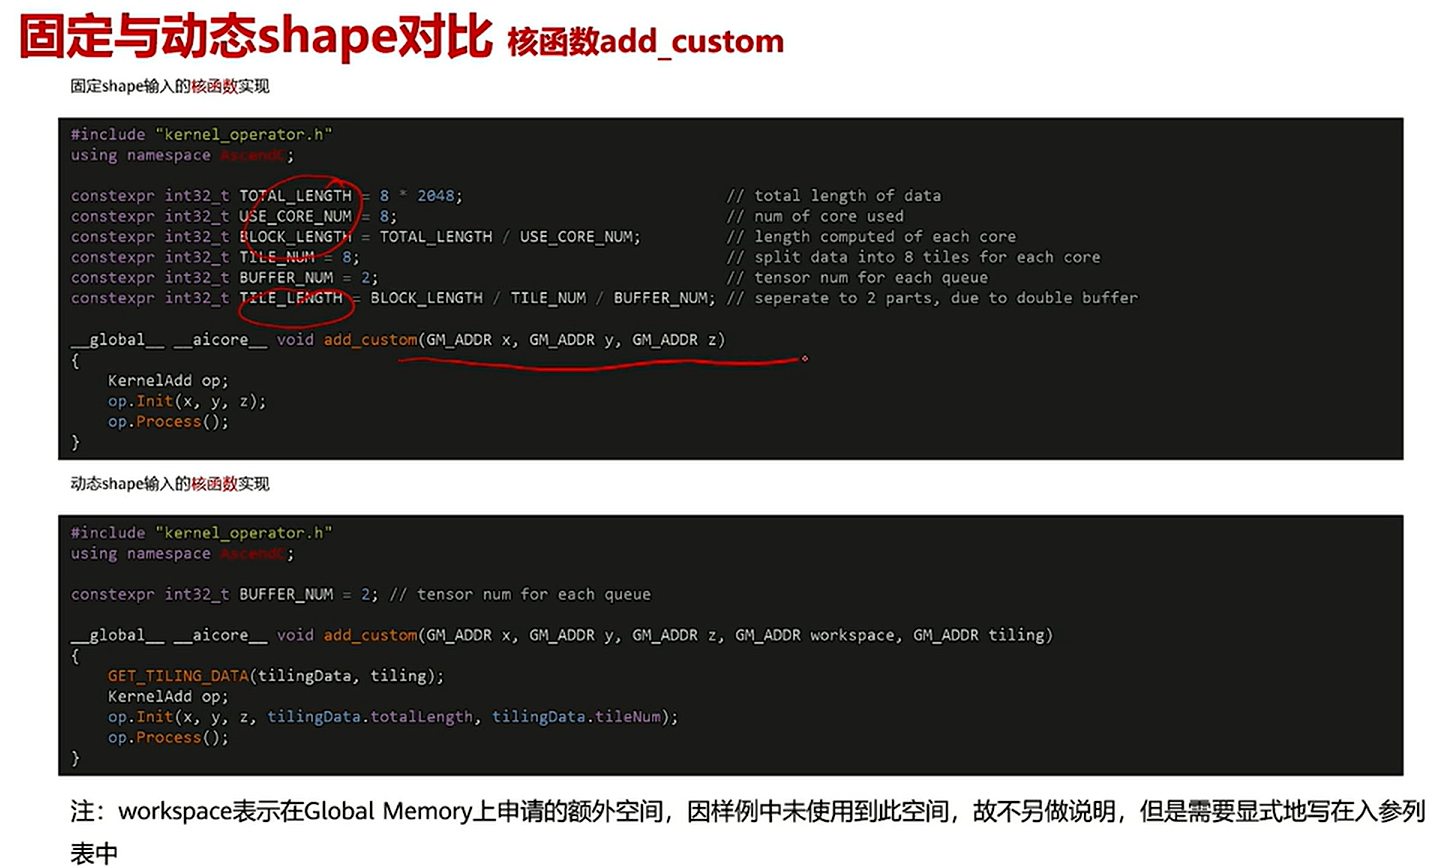
extern "C" __global__ __aicore__ void add_custom(GM_ADDR x, GM_ADDR y, GM_ADDR z, AddCustomTilingData tiling)
{
    KernelAdd op;
    op.Init(x, y, z, tiling.totalLength, tiling.tileNum);
    op.Process();
}
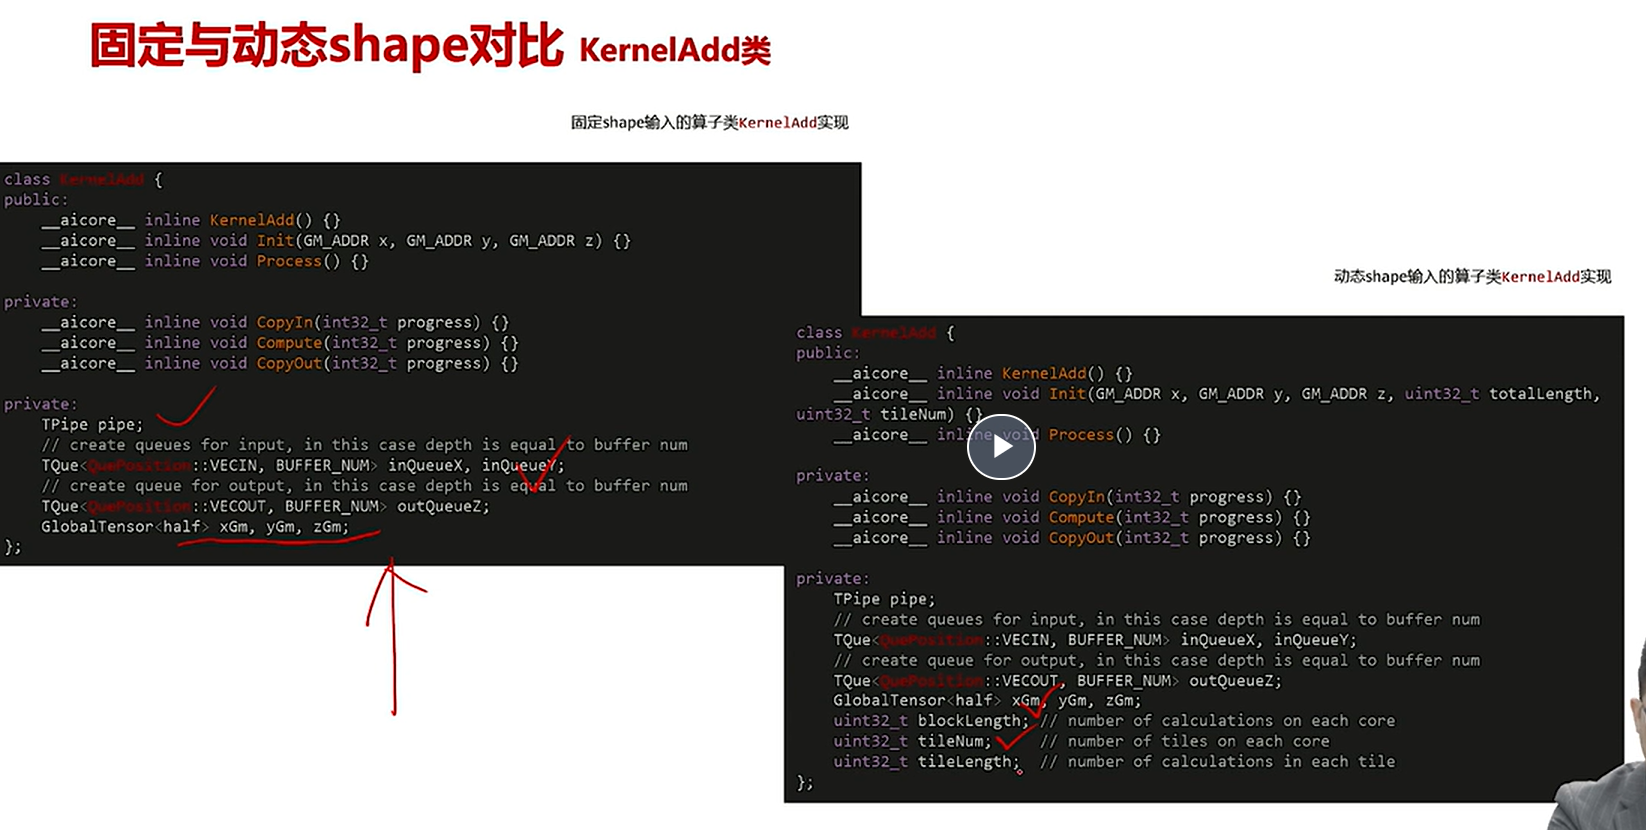
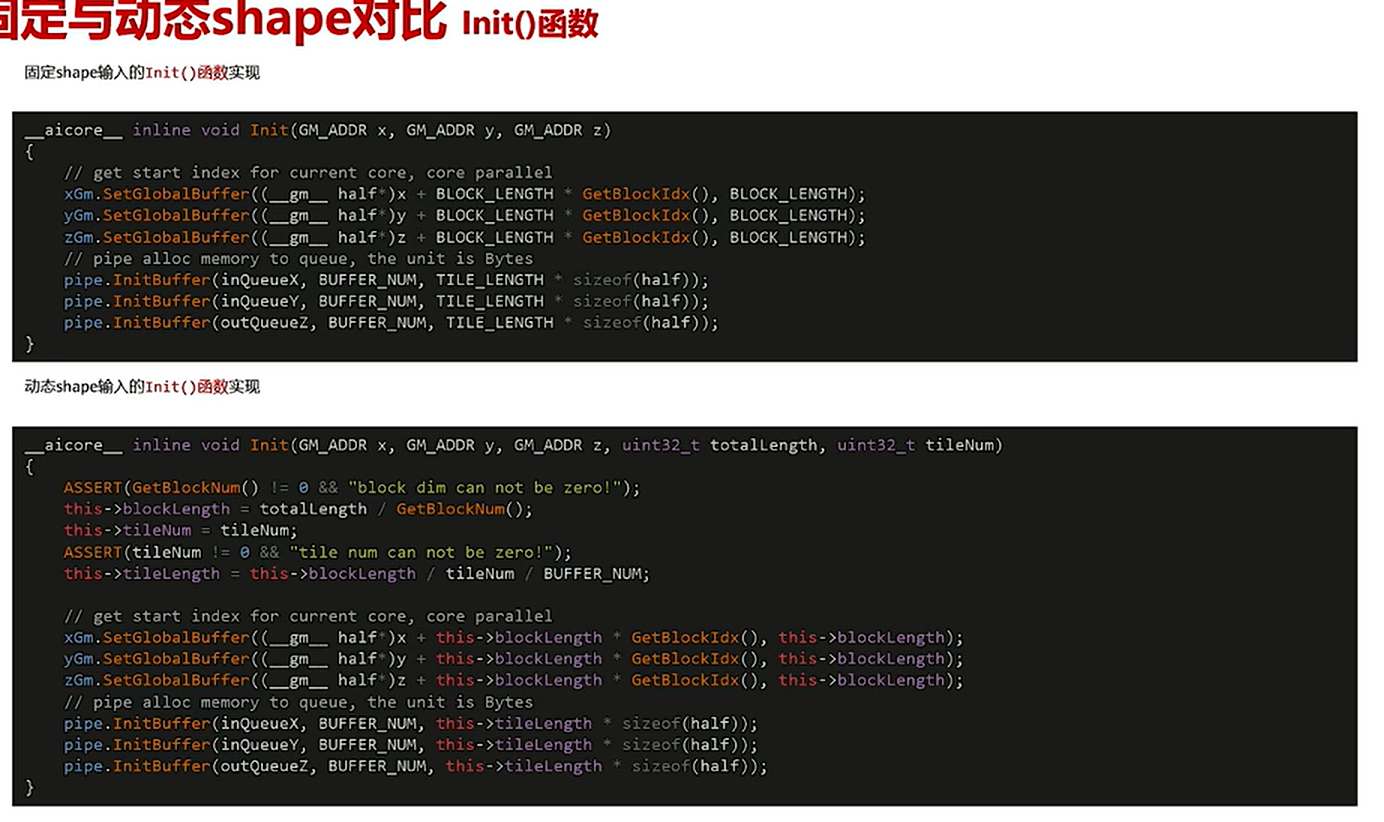
    __aicore__ inline void Init(GM_ADDR x, GM_ADDR y, GM_ADDR z, uint32_t totalLength, uint32_t tileNum)
    {
        this->blockLength = totalLength / GetBlockNum();
        this->tileNum = tileNum;
        this->tileLength = this->blockLength / tileNum / BUFFER_NUM;
        xGm.SetGlobalBuffer((__gm__ half *)x + this->blockLength * GetBlockIdx(), this->blockLength);
        yGm.SetGlobalBuffer((__gm__ half *)y + this->blockLength * GetBlockIdx(), this->blockLength);
        zGm.SetGlobalBuffer((__gm__ half *)z + this->blockLength * GetBlockIdx(), this->blockLength);
        pipe.InitBuffer(inQueueX, BUFFER_NUM, this->tileLength * sizeof(half));
        pipe.InitBuffer(inQueueY, BUFFER_NUM, this->tileLength * sizeof(half));
        pipe.InitBuffer(outQueueZ, BUFFER_NUM, this->tileLength * sizeof(half));
    }
1.2 shape
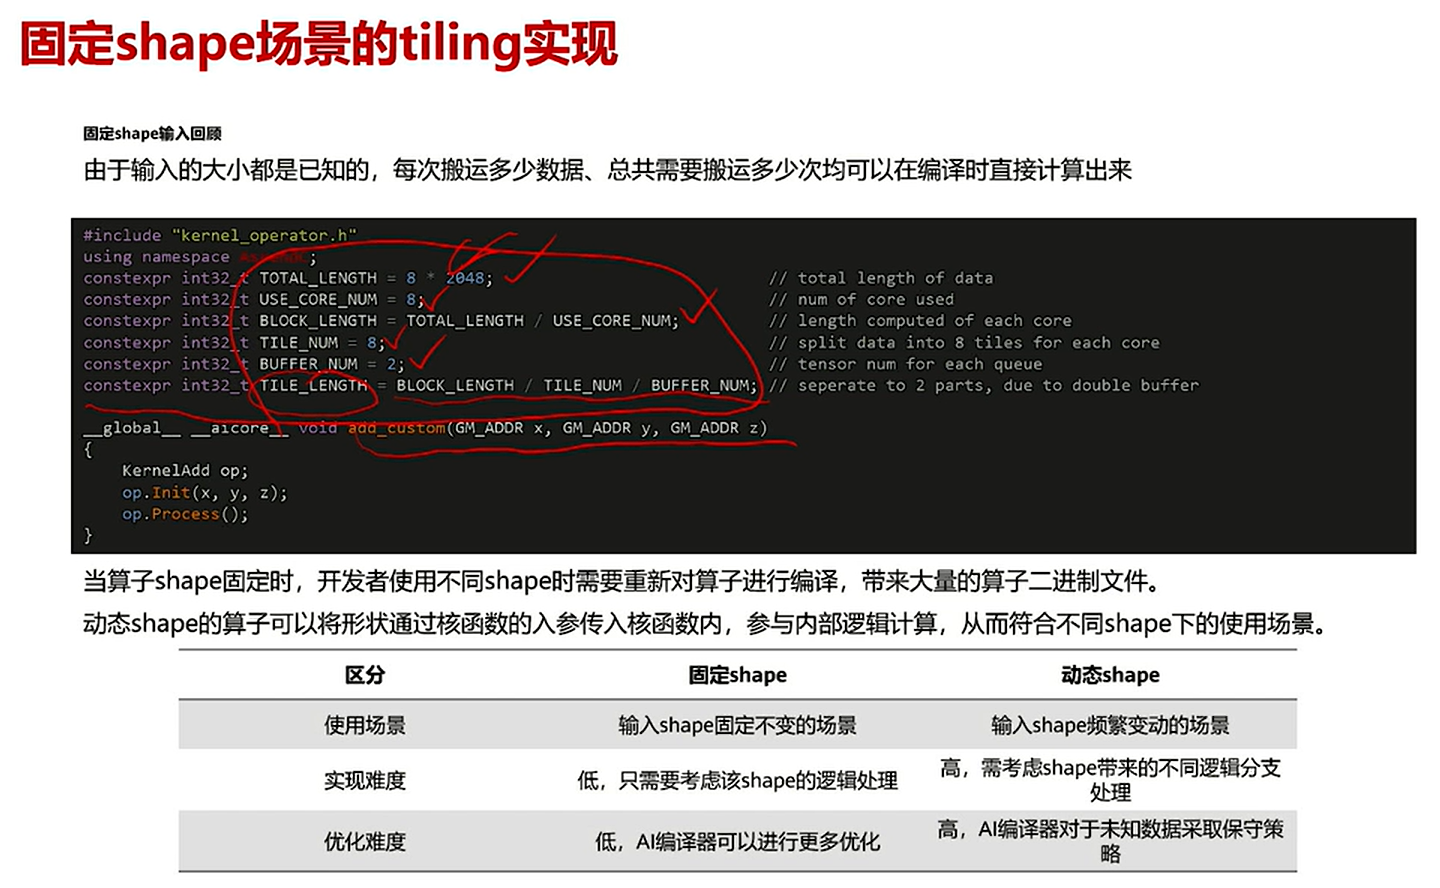
静态shape下,切分块数量、总长度、每个核的长度,是提前定义好的。
在动态shape下,就需要定义成员变量,每次init时去计算
2. Shape推导
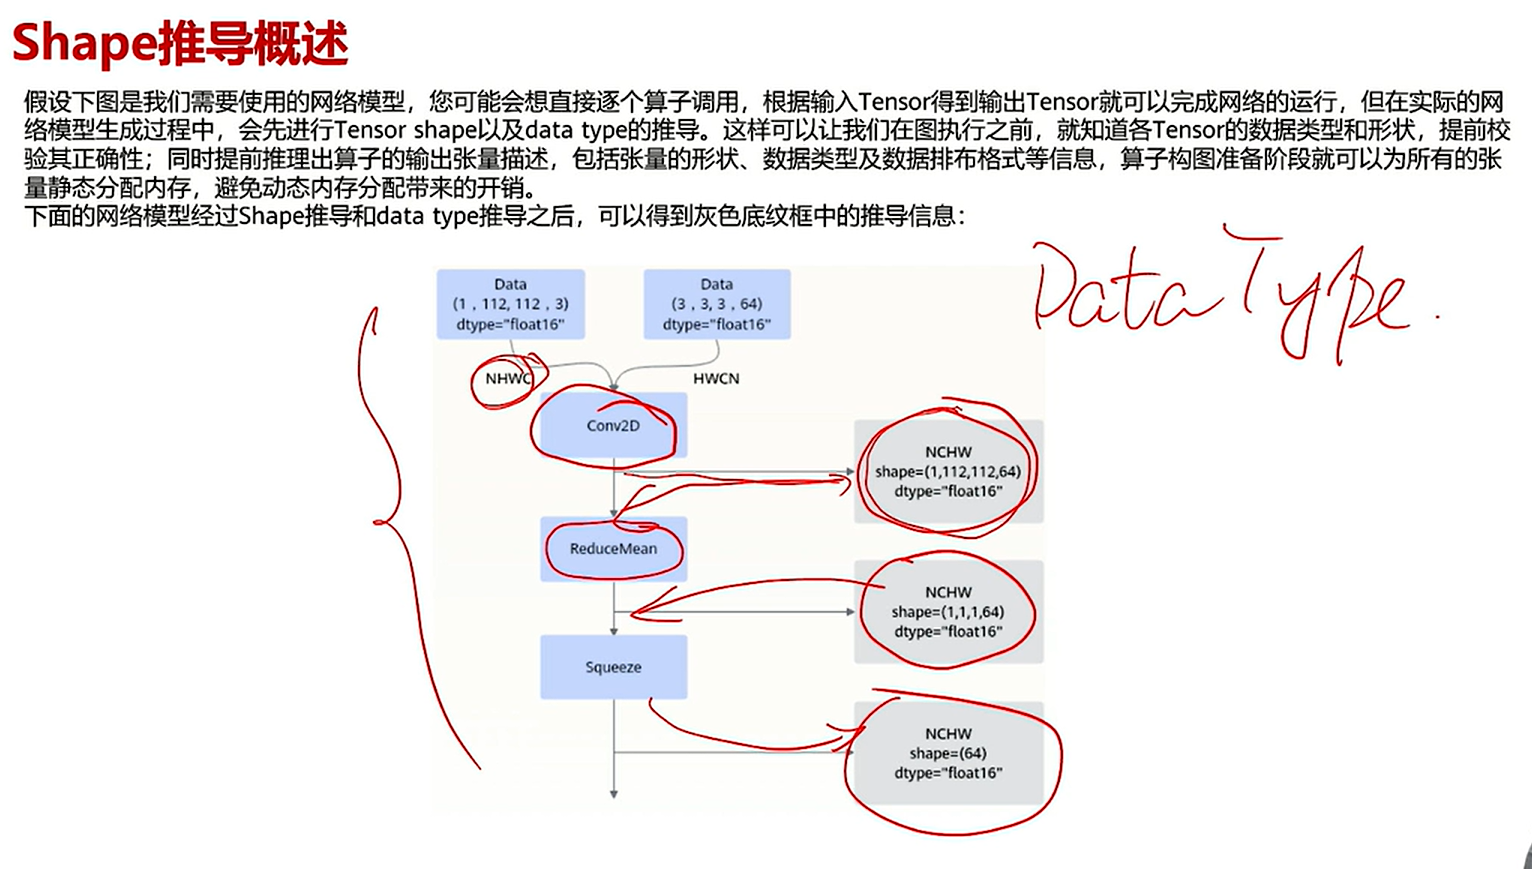
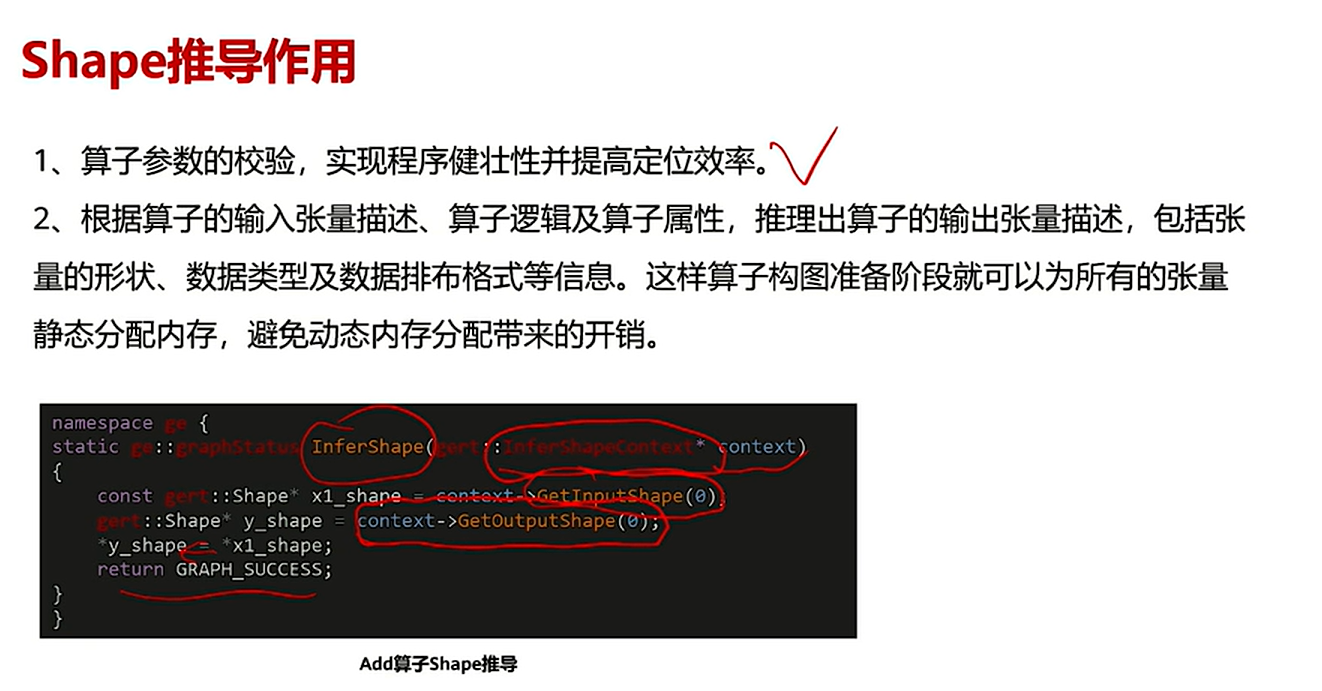
在进入算子之前,就可以通过输入信息、输入结构,推导到输出数据的结构。
在算子执行事前就申请好输入、输出的空间
如最简单的add例子,输入输出的shape一样
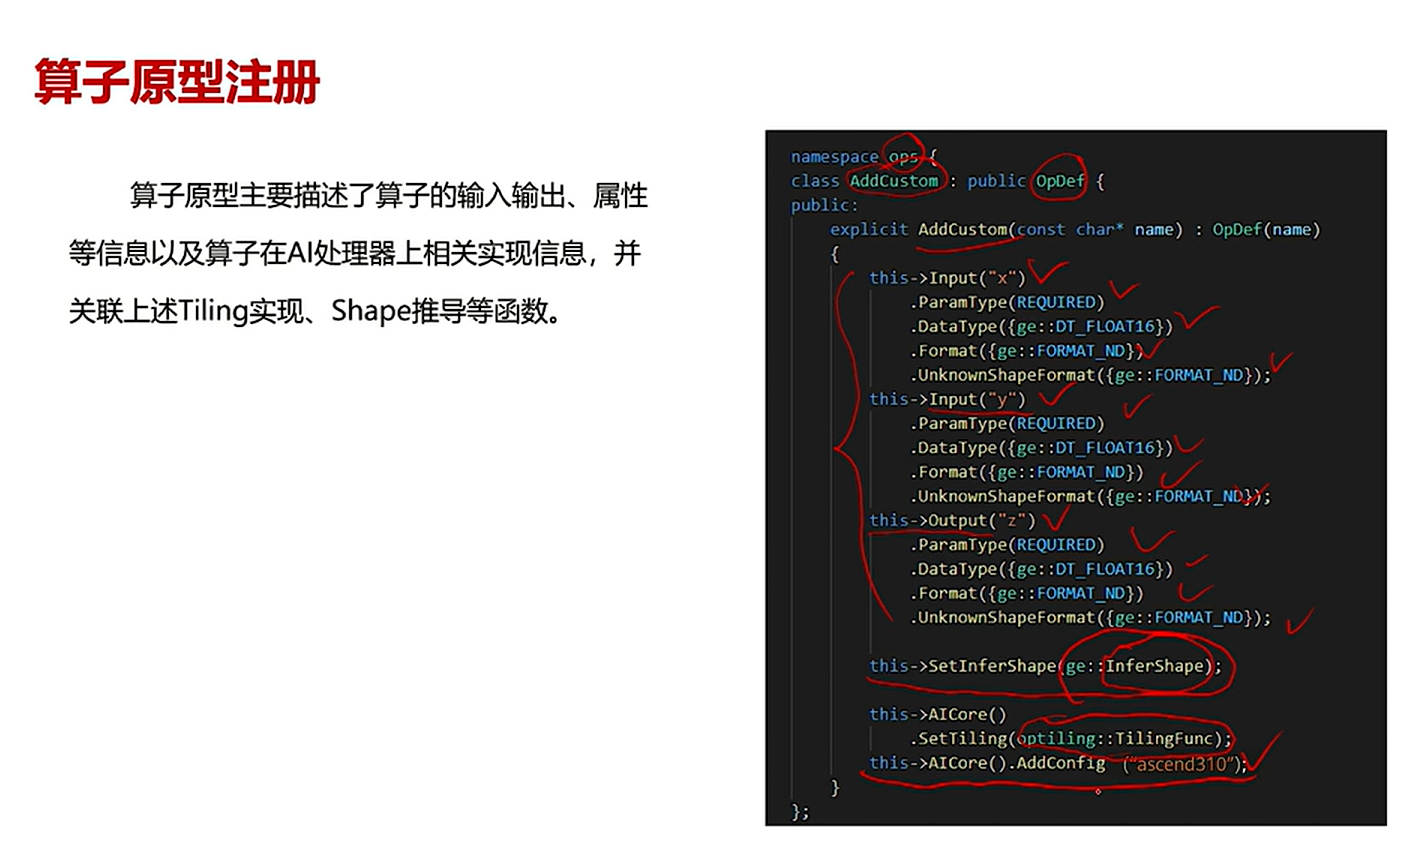
3. 算子原型注册
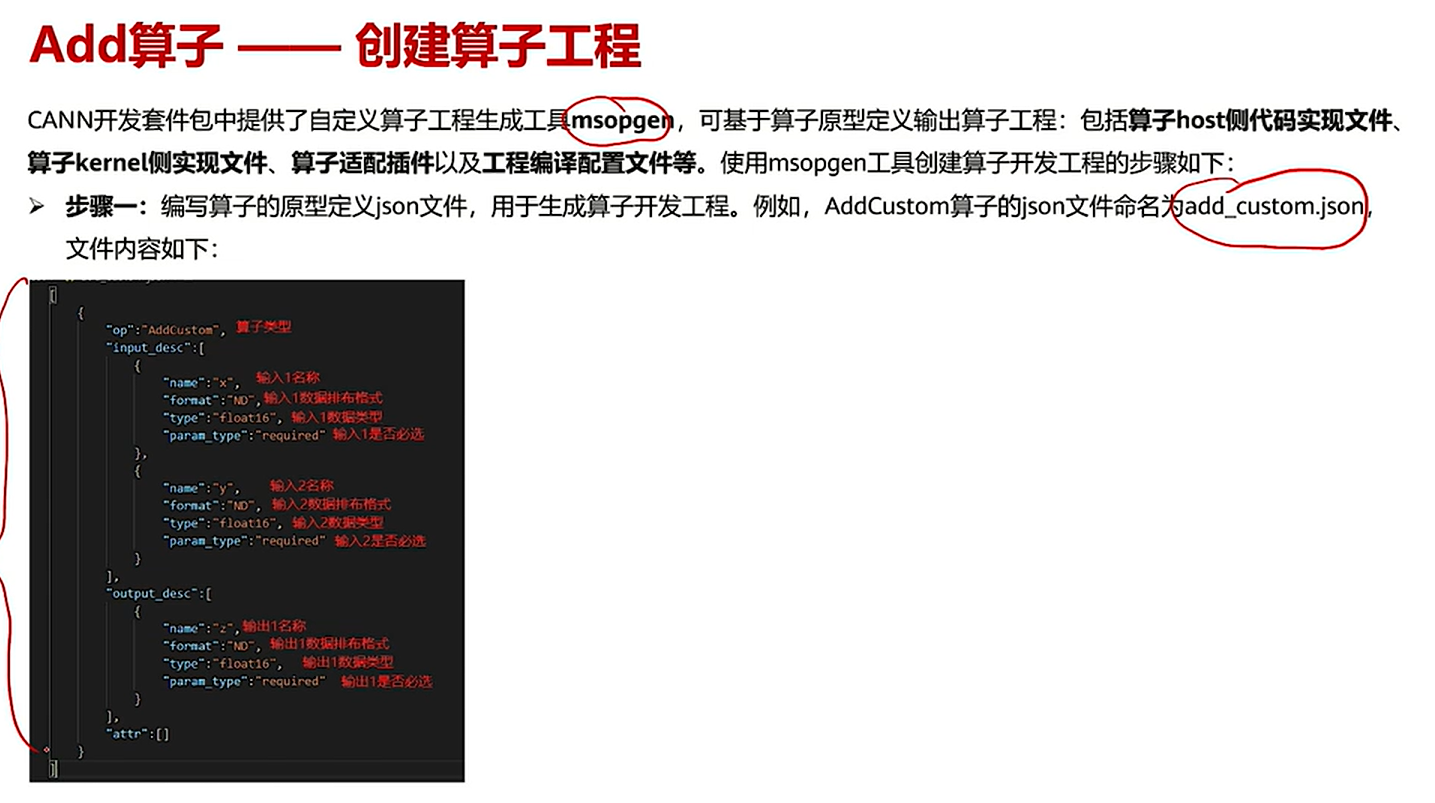
有工具可以生成
- 参数说明
- 参数是否必传
- 类型
- 数据排布格式
- 无法获取形状时,如何排布
- 形状推导函数:
ge::InferShape- 定义
Tiling函数- 注册处理器,可以注册多个
工程
两种方式
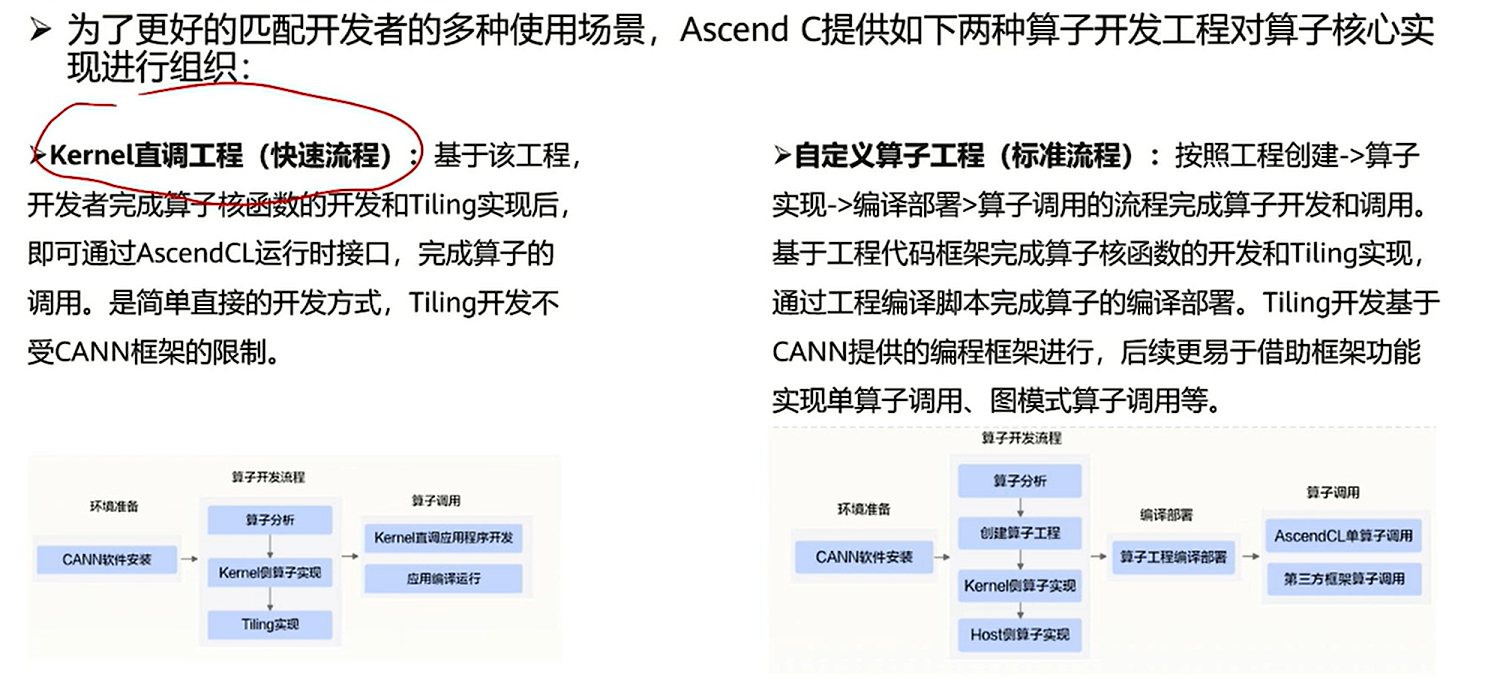
1. Kernel直调
2. 自定义算子工程
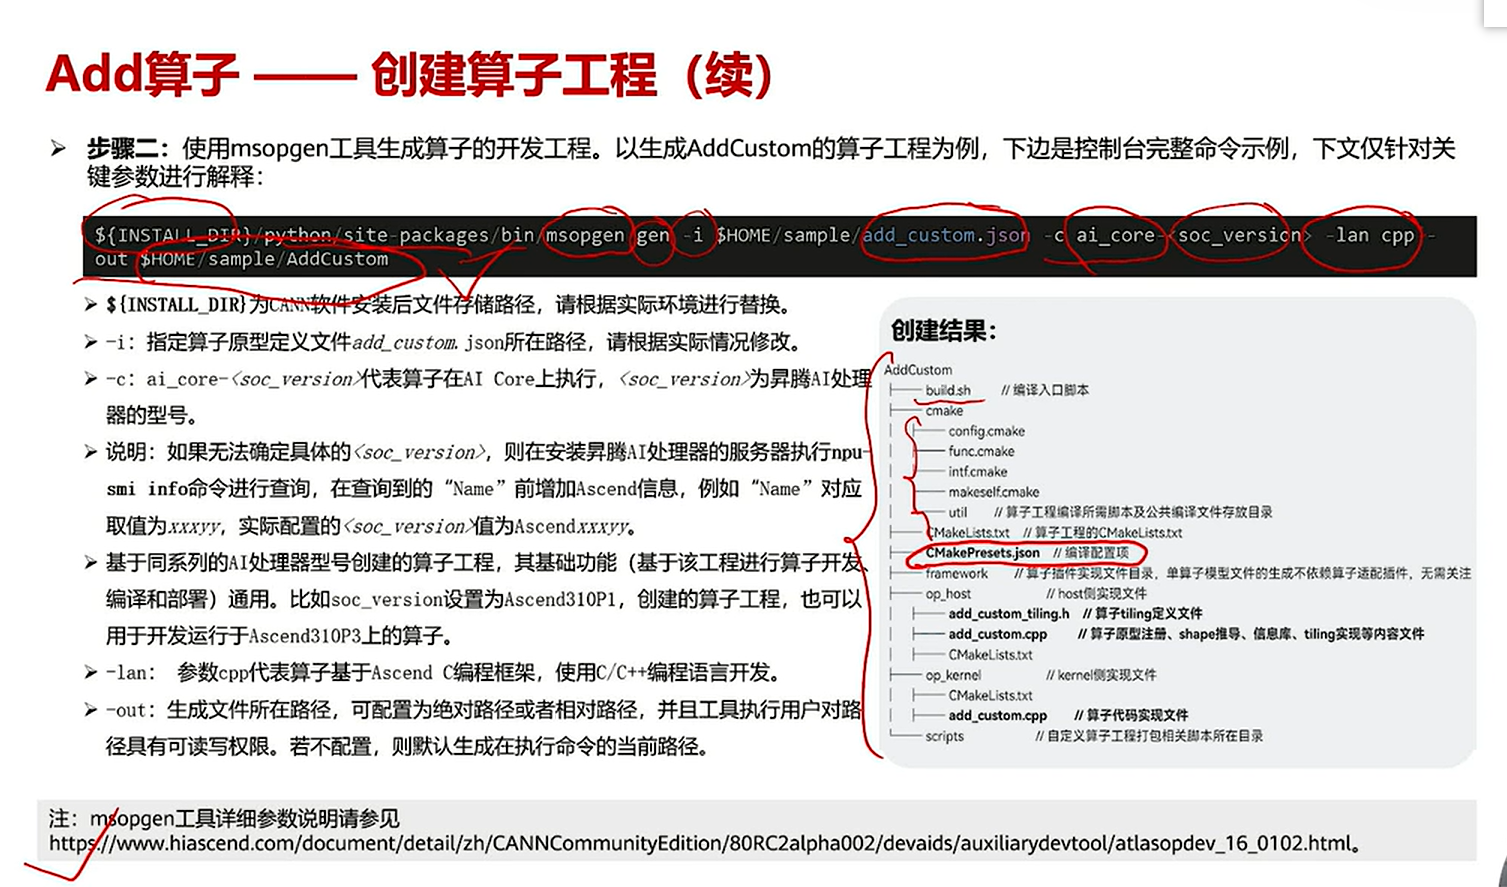
[
  {
    "op":"Conv2D",
    "input_desc":[{
      "name":"x",
      "param_type":"required",
      "format":[
        "NCHW"
      ],
      "type":[
        "fp16"
      ]
    },
      {
        "name":"filter",
        "param_type":"required",
        "format":[
          "NCHW"
        ],
        "type":[
          "fp16"
        ]
      }
    ],
    "output_desc":[{
      "name":"y",
      "param_type":"required",
      "format":[
        "NCHW"
      ],
      "type":[
        "fp16"
      ]
    }
    ],
    "attr":[{
      "name":"strides",
      "param_type":"required",
      "type":"list_int"
    },
      {
        "name":"pads",
        "param_type":"required",
        "type":"list_int"
      },
      {
        "name":"dilations",
        "param_type": "optional",
        "type":"list_int",
        "default_value":[1,1,1,1]
      }
    ]
  }
]
./msopgen gen -i /root/z/kernal/test/tmp.json -c ai_core-ascend310 -lan cpp -out /root/z/kernal/test/output_data
3. 算子编译
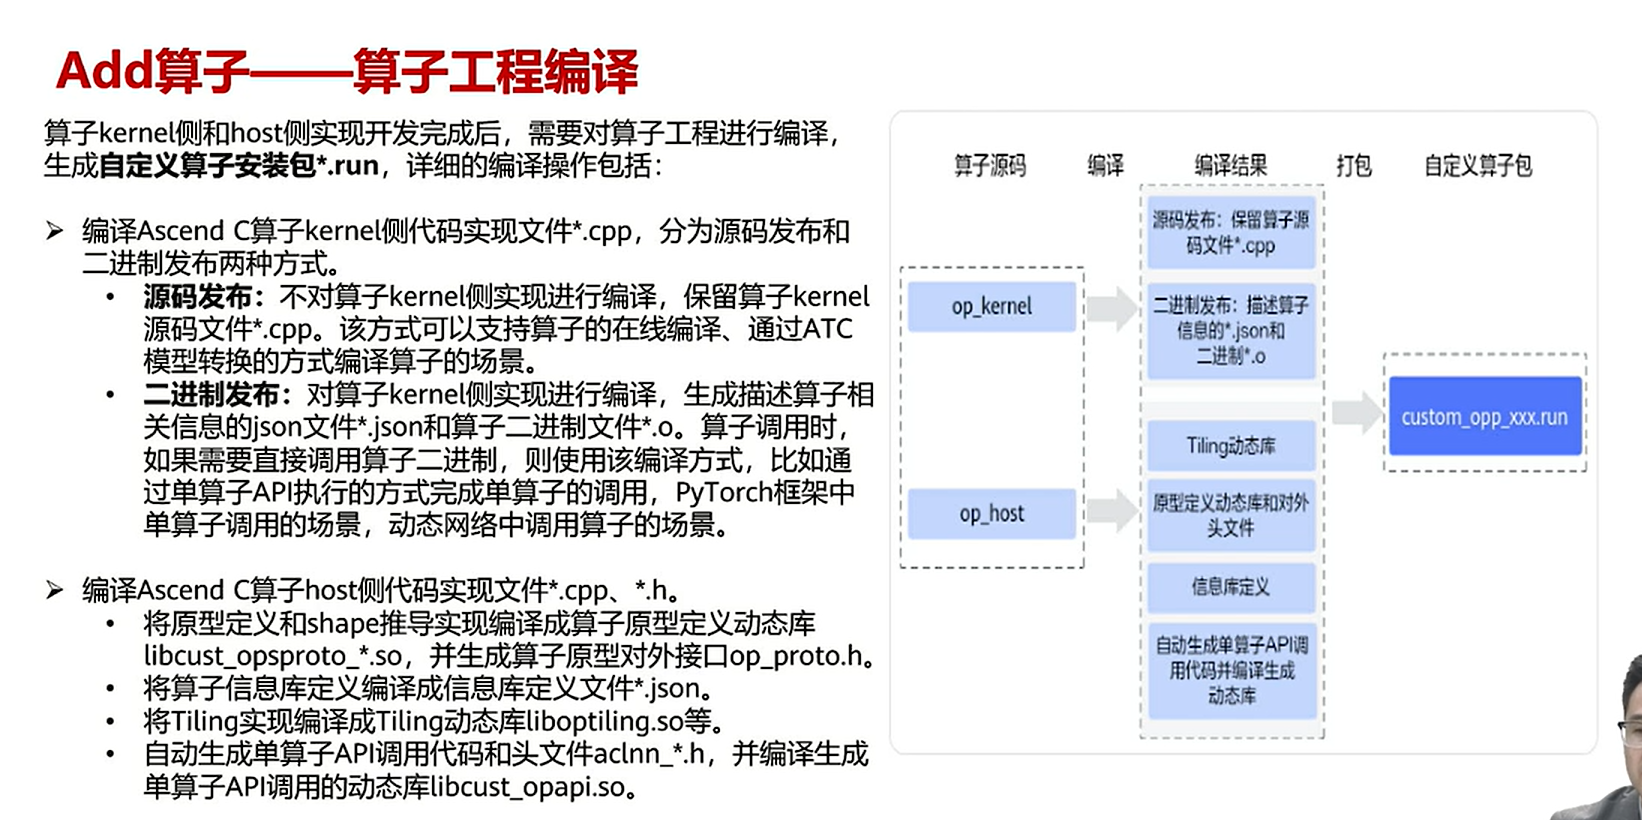
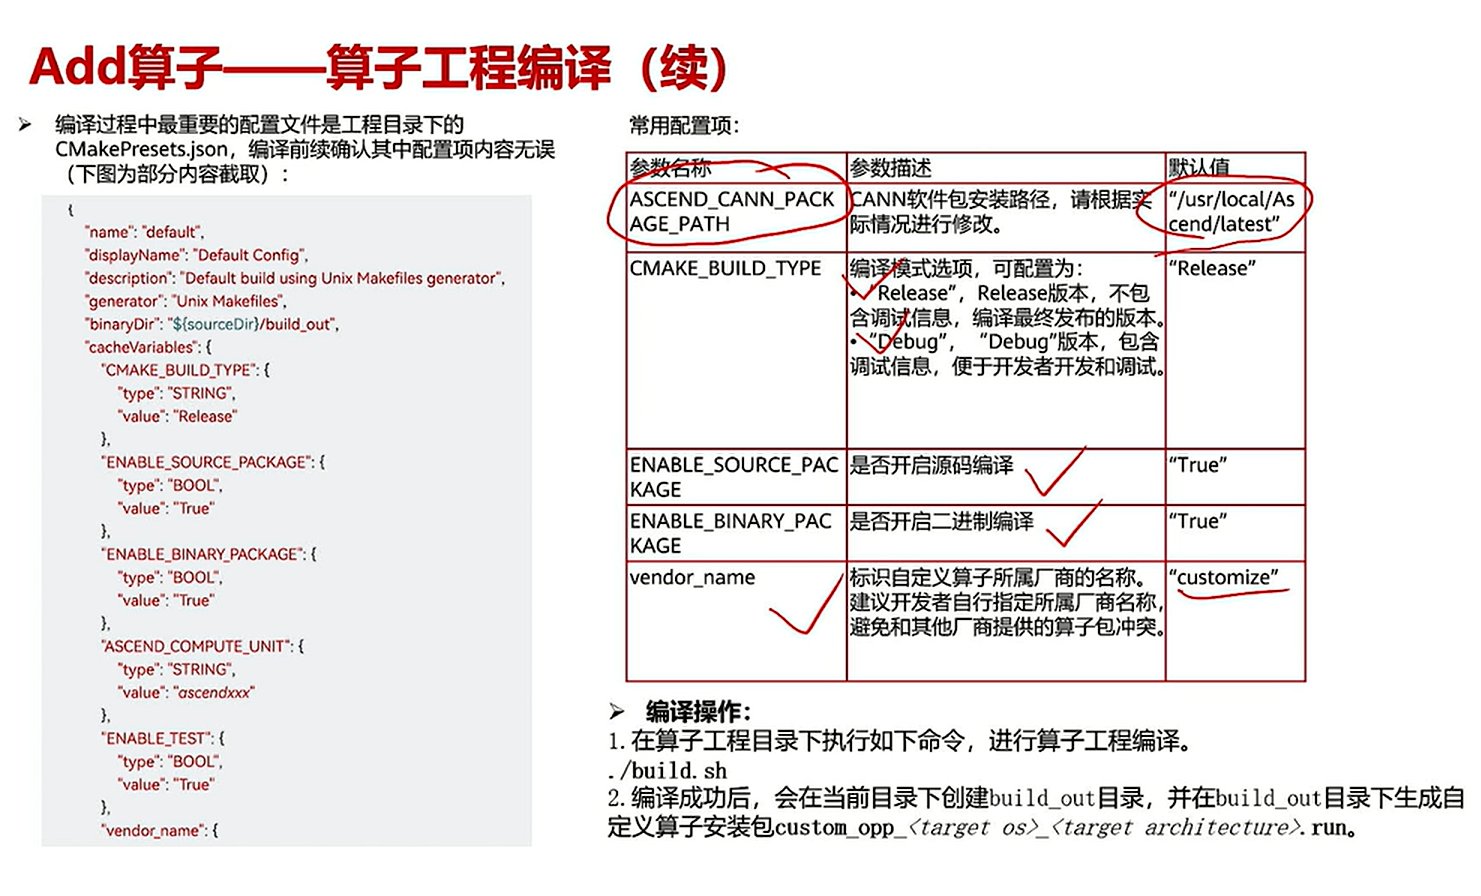
执行build之后,在这个下,可以看到安装的算子
/usr/local/Ascend/ascend-toolkit/latest/opp/vendors/customize/op_impl/ai_core/tbe/kernel/
API
1. 基础API
计算类API,基于Local Memory的数据
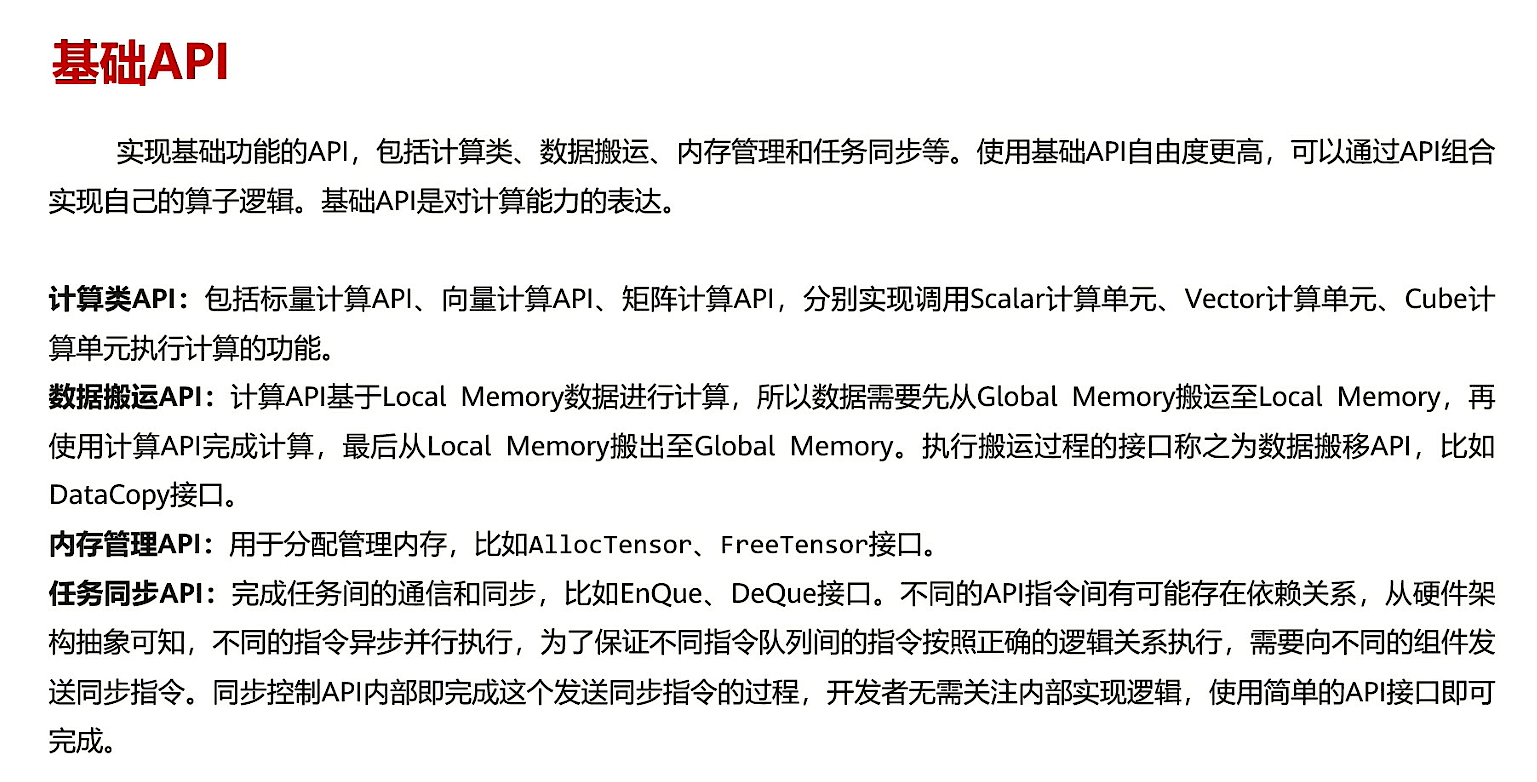
1.1 计算类
1.1.0 运算操作
- 以LocalTensor做为类型
- 计算运算已经进行了重载,可以直接用。这个时候是对整个LocalTensor做计算
- 可以选择连续的某一部分做计算,另一部分不做计算
- 高纬切分:可以选择跳着做计算,比如地址1、3、5做计算,2、4、6不做计算
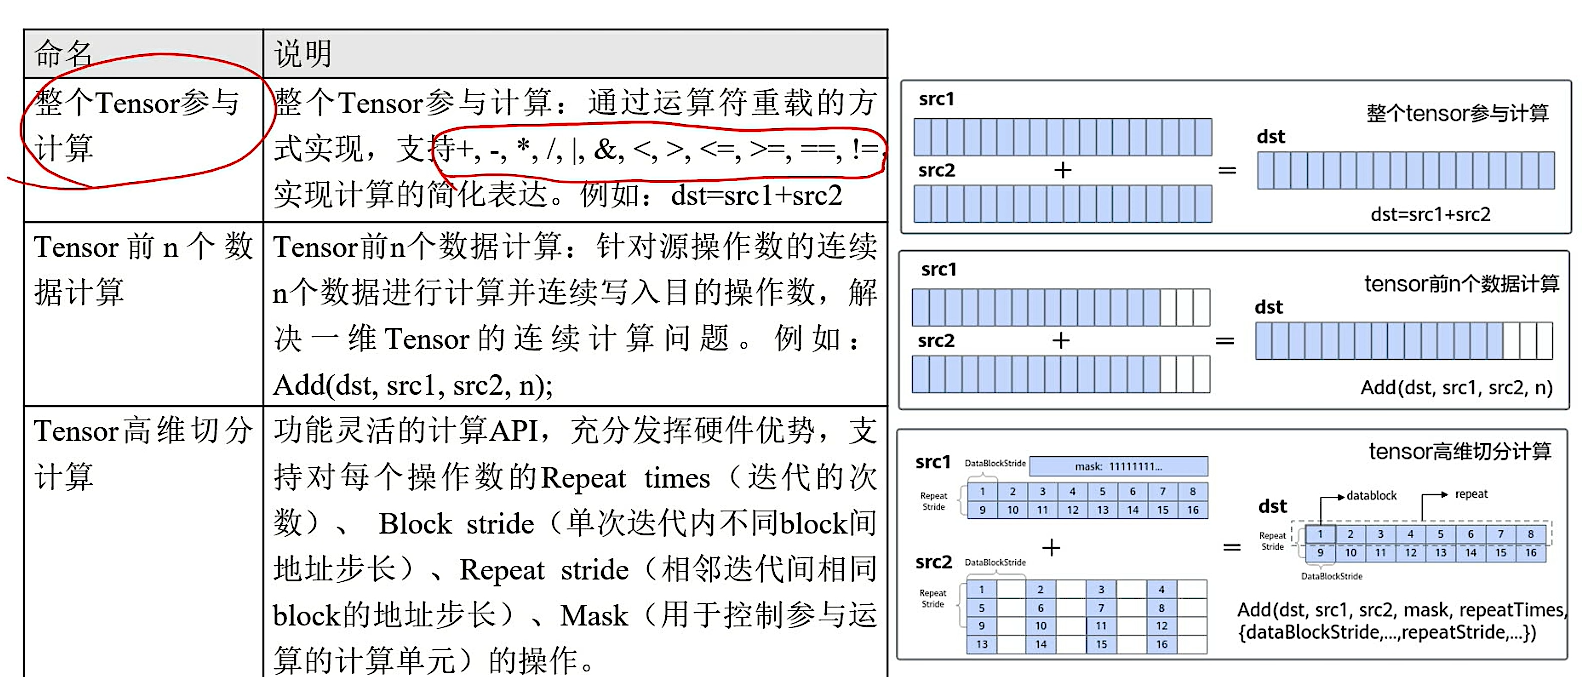
1.1.1 高纬切分
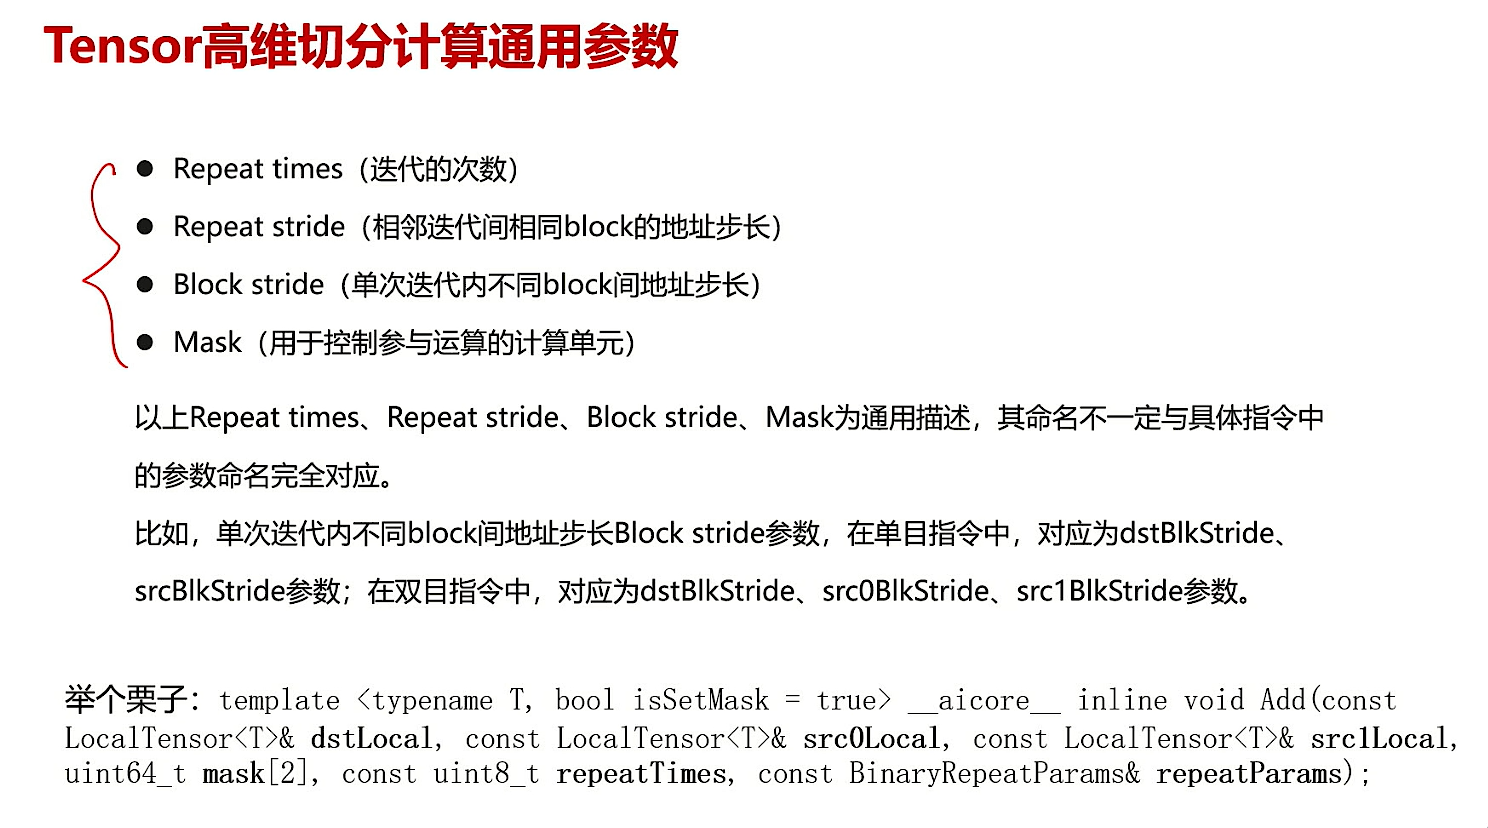
一般一个指令能处理256字节B的数据,这里的一个block是32B
下面是假如有16个block,每次能拿8个(256B),那么需要执行两次(迭代两次)
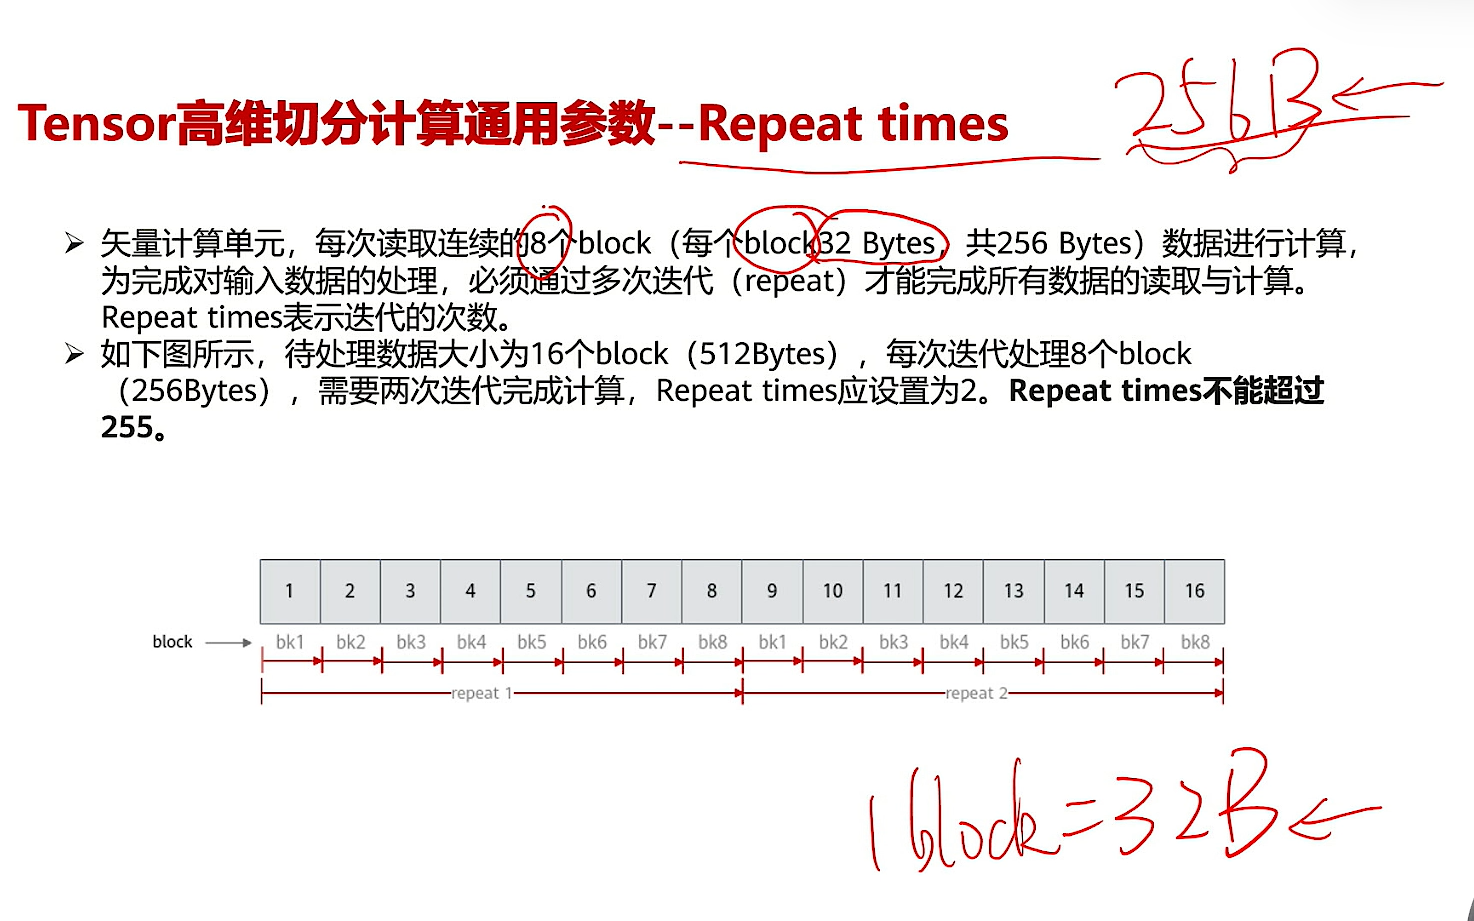
1.1.2 Repeat Times
- Repeat Times 迭代的次数,单位一般是block,一般一次8个block,256B
- 一次迭代:向量单元运算一次
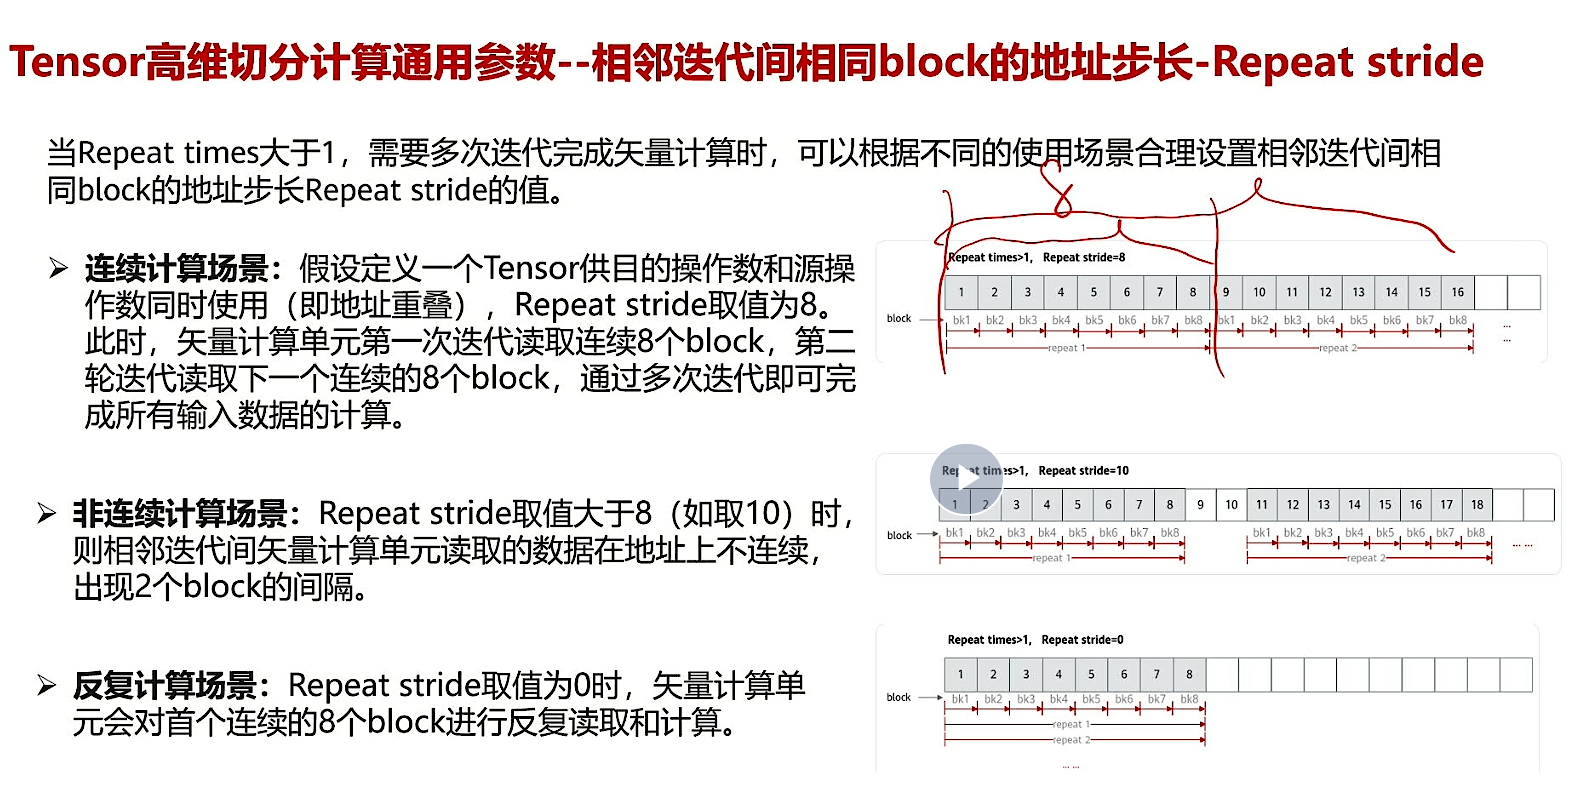
1.1.2 Repeat stride
- 两个block地址连续
- 两个block地址不连续
- Repeat stride 两次迭代的距离
1.1.3 Block stride
- Block stride 一个迭代内,两个block之间的距离
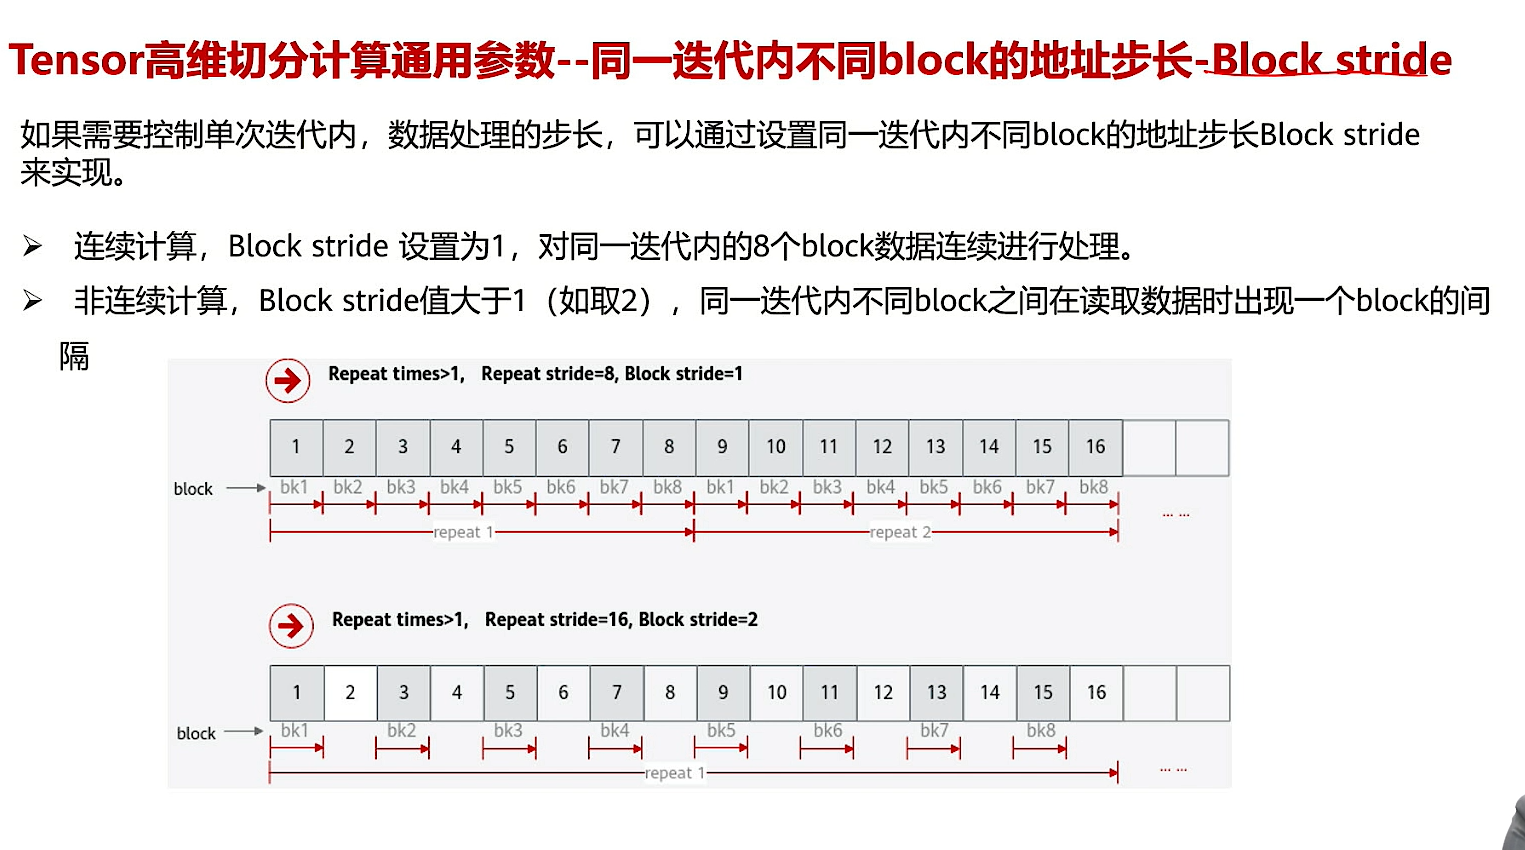
1.1.4 Mask
解决的问题:假如数值类型是half(半精度浮点,
16b=2B),那么1block=16half,那么在这16个位上做一些运算配置操作。
- 连续模式:mask是数字,代表前mask个元素做计算
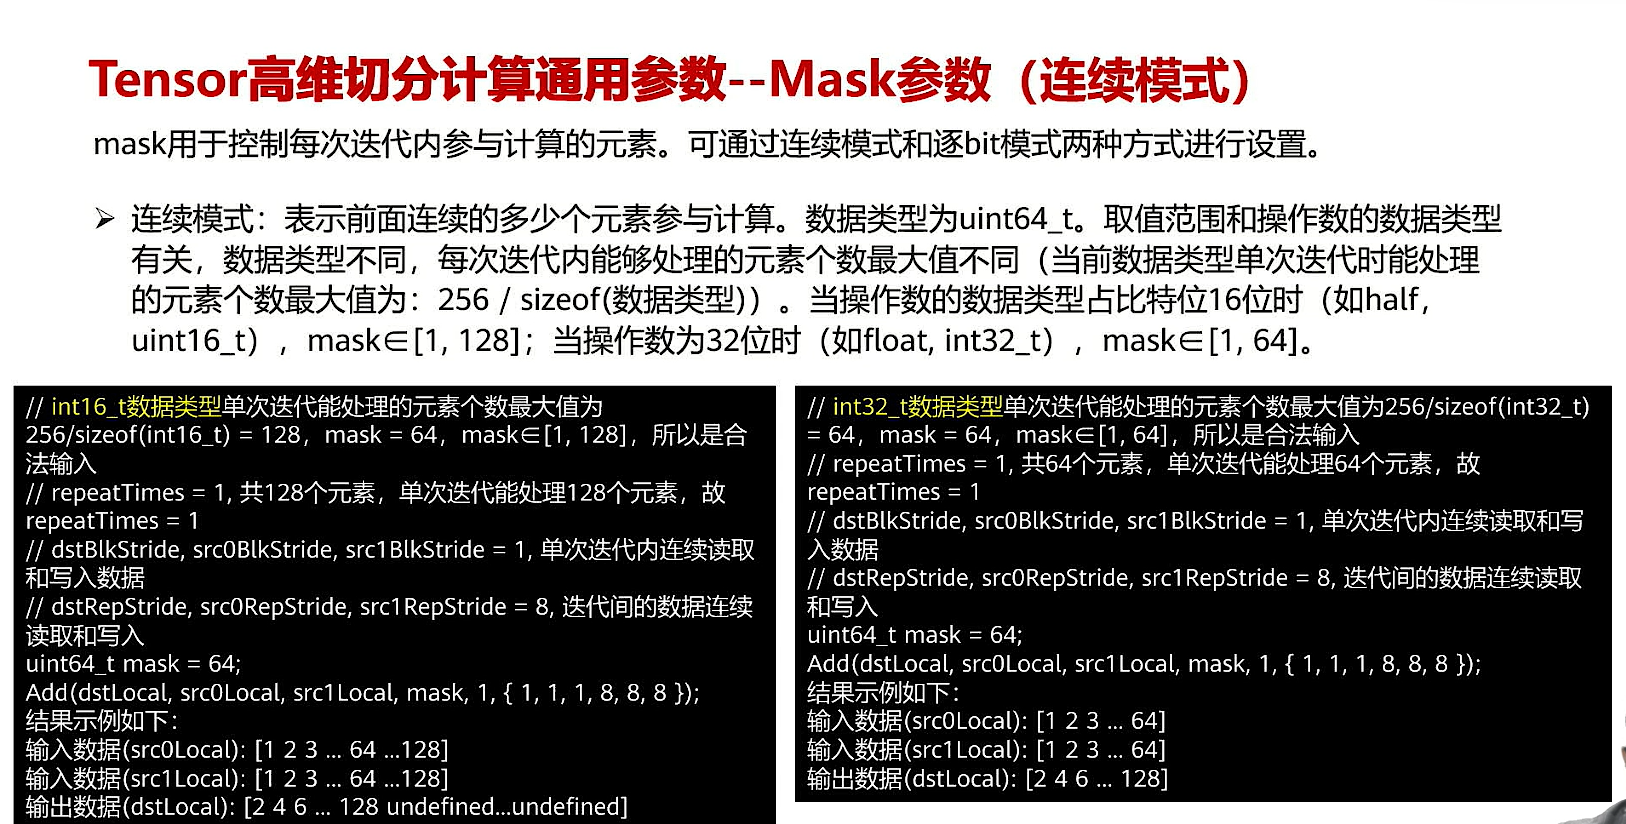
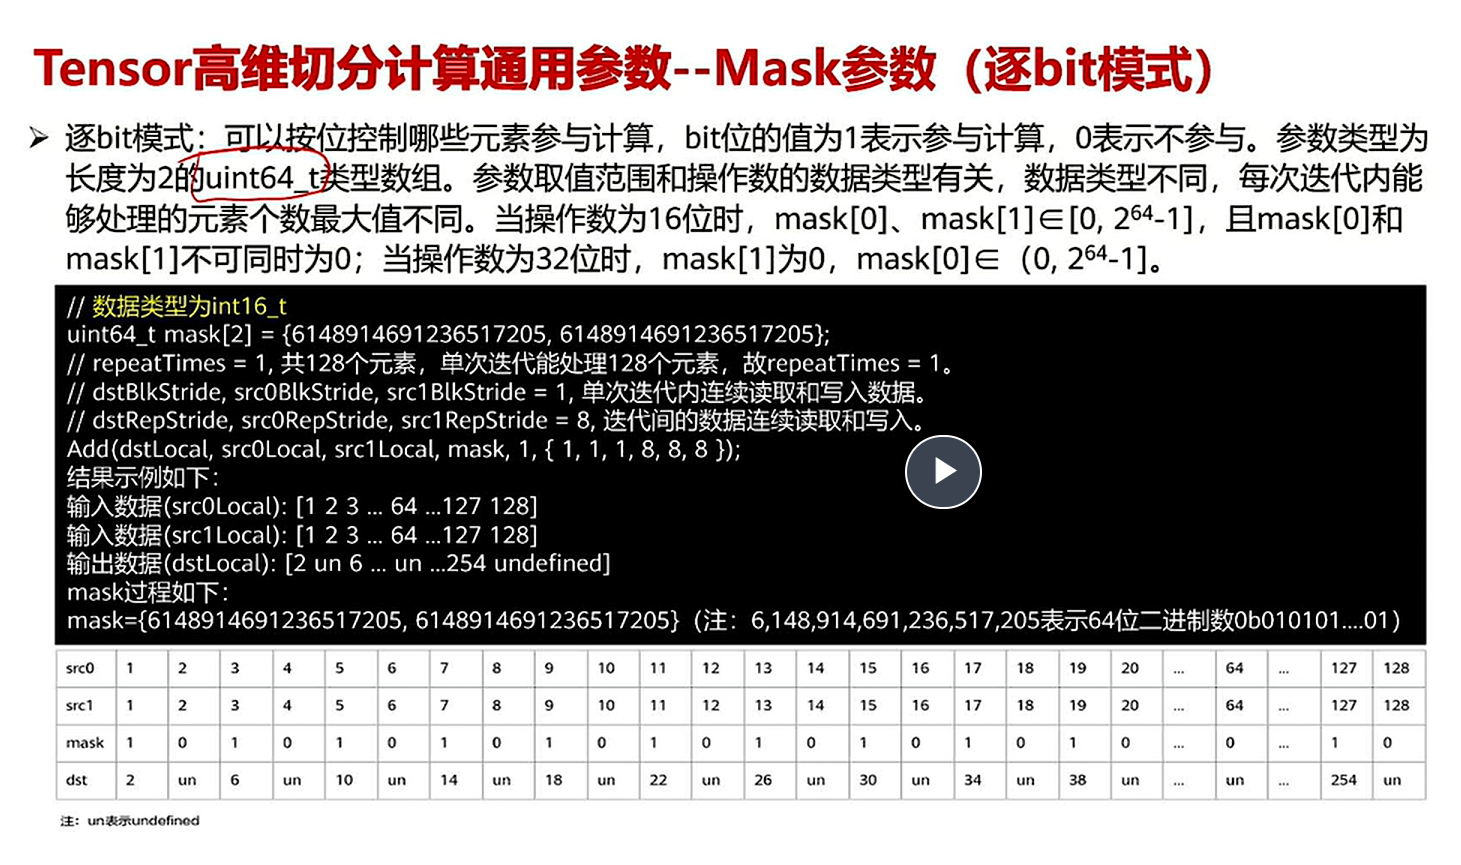
逐
bit模式,mask类型为数组。转为二进制后,1代表改位参与计算,0相反
mask长度必须是2,元素类型uint64,可以表示64位的数据
如果操作数是128位,所以mask[0]、mask[1]都需要。如果操作数是64位,只需要mask[0],mask[1]=0
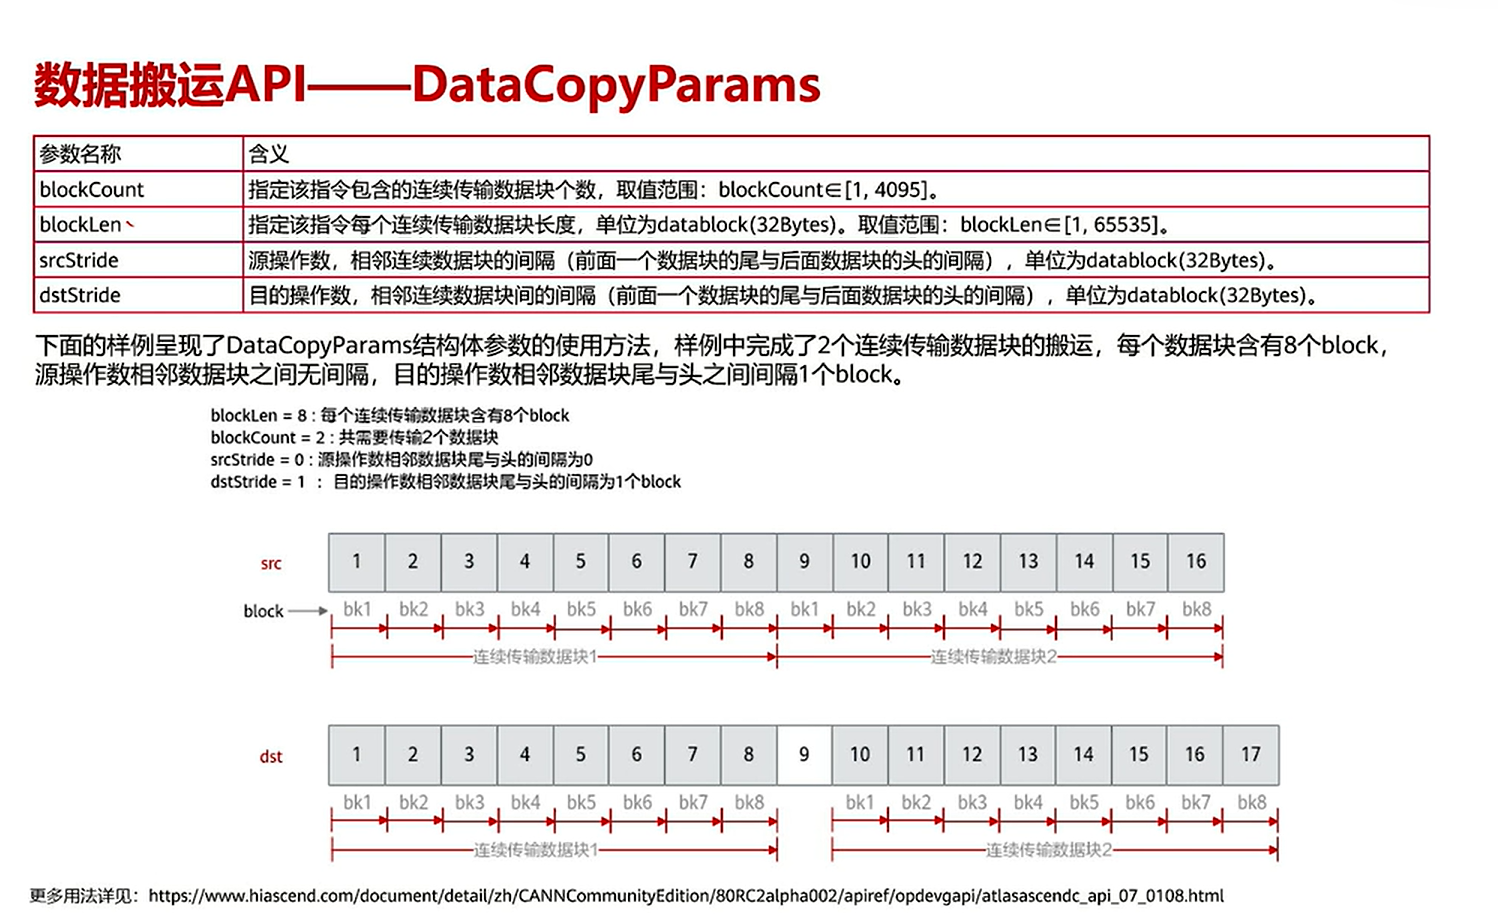
1.2 数据搬运类
(源地址,目的地址,搬运个数)
(源地址,目的地址,跳着搬运的参数)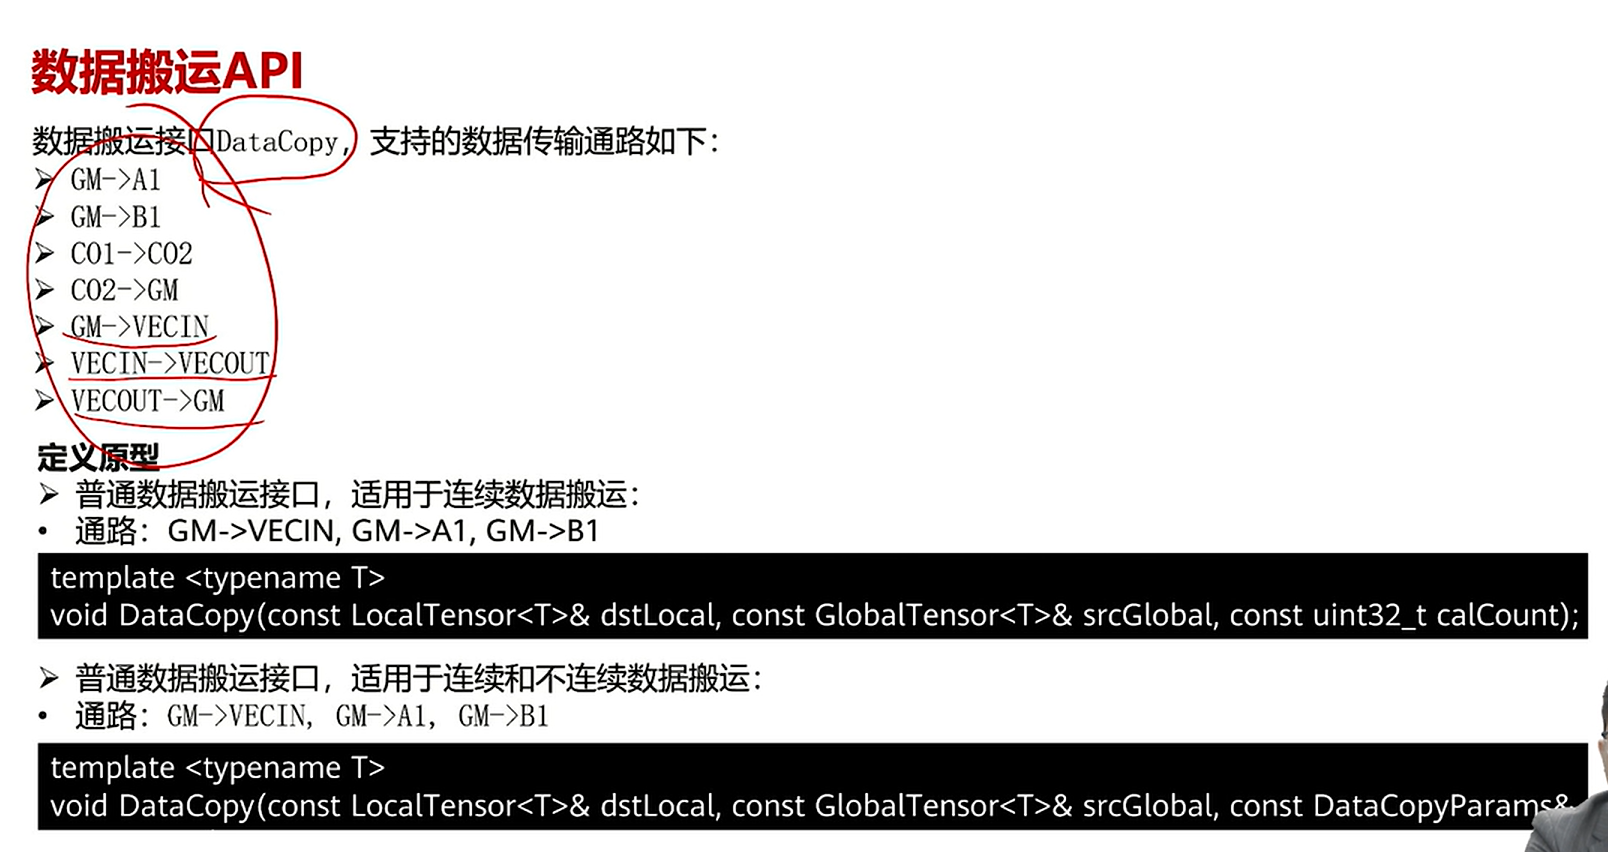
和计算类不一样,计算类stride是按照头,这个是按照尾巴
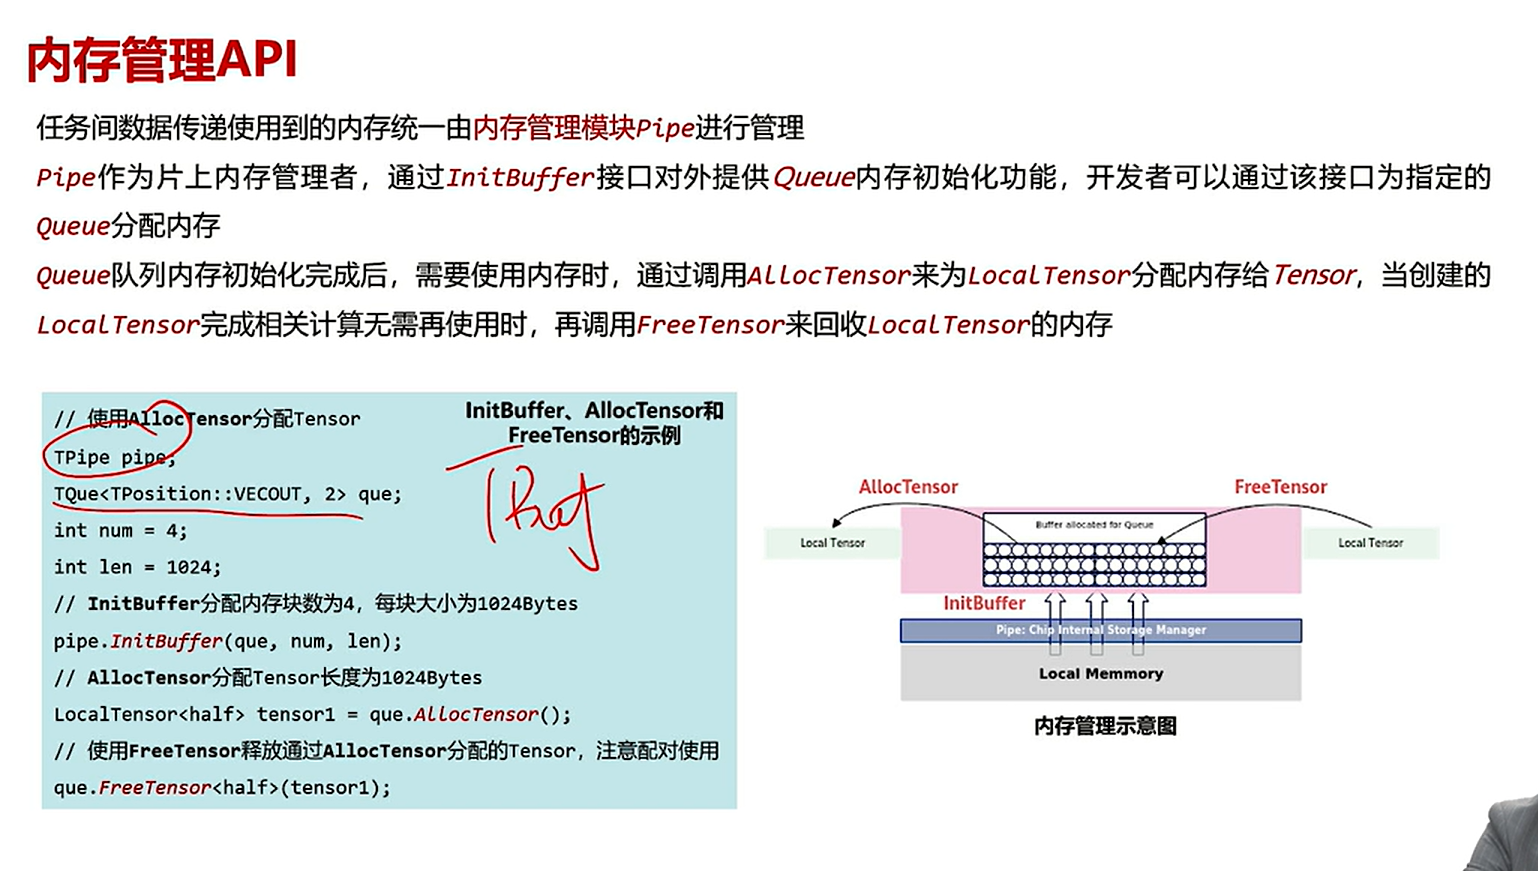
TQue的位置在VECIN、VECOUT,管理输入输出TBuf的位置在VECCAL,管理中间变量
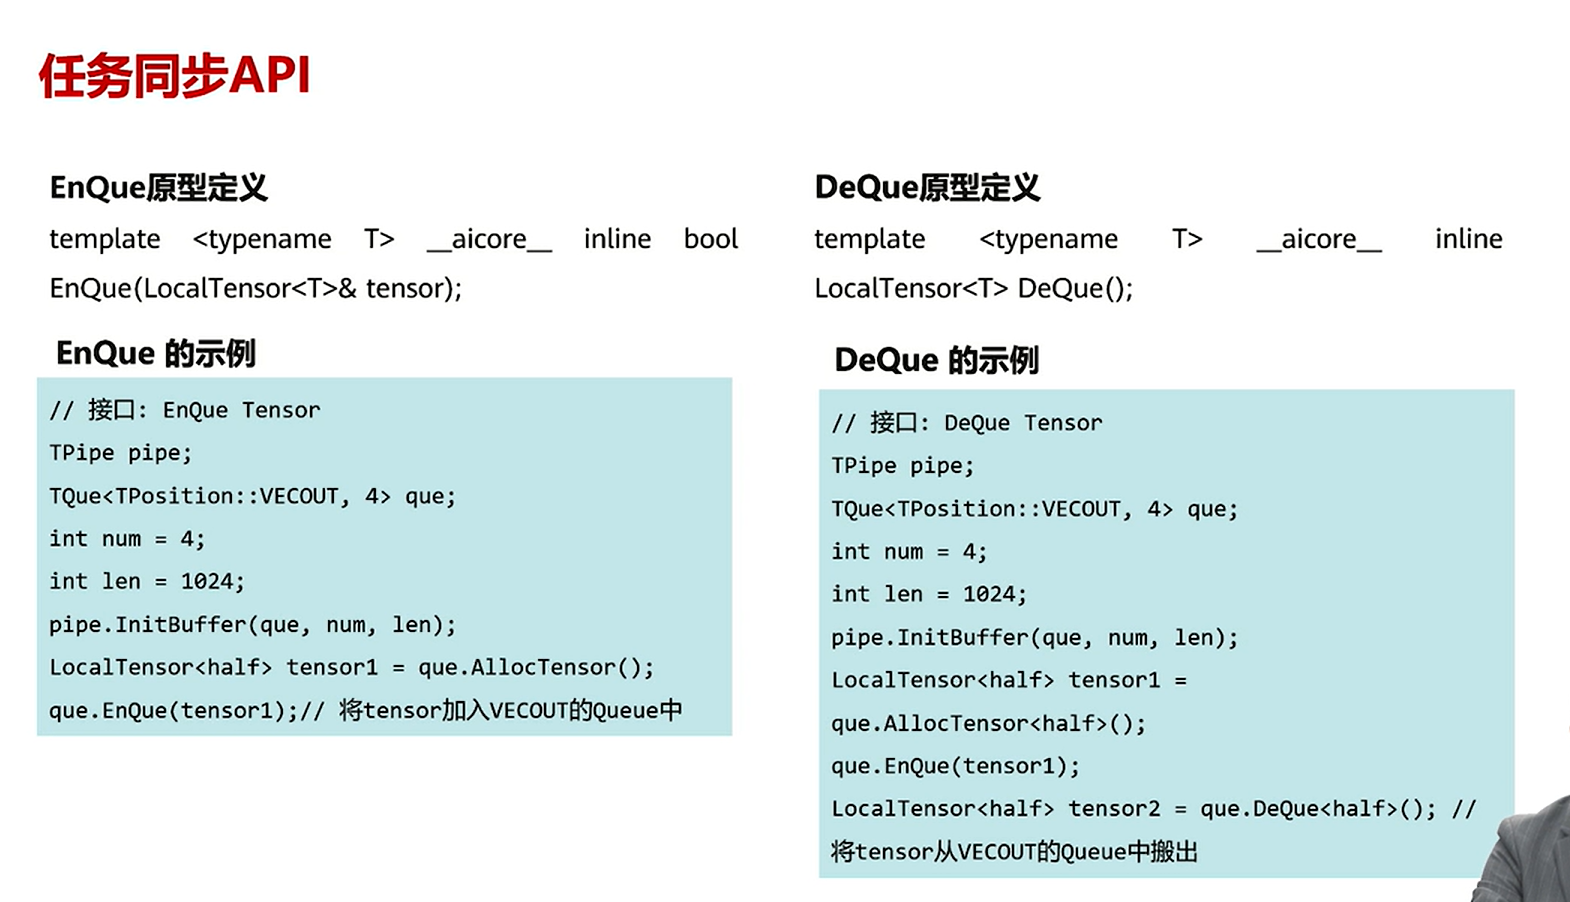
调用方式
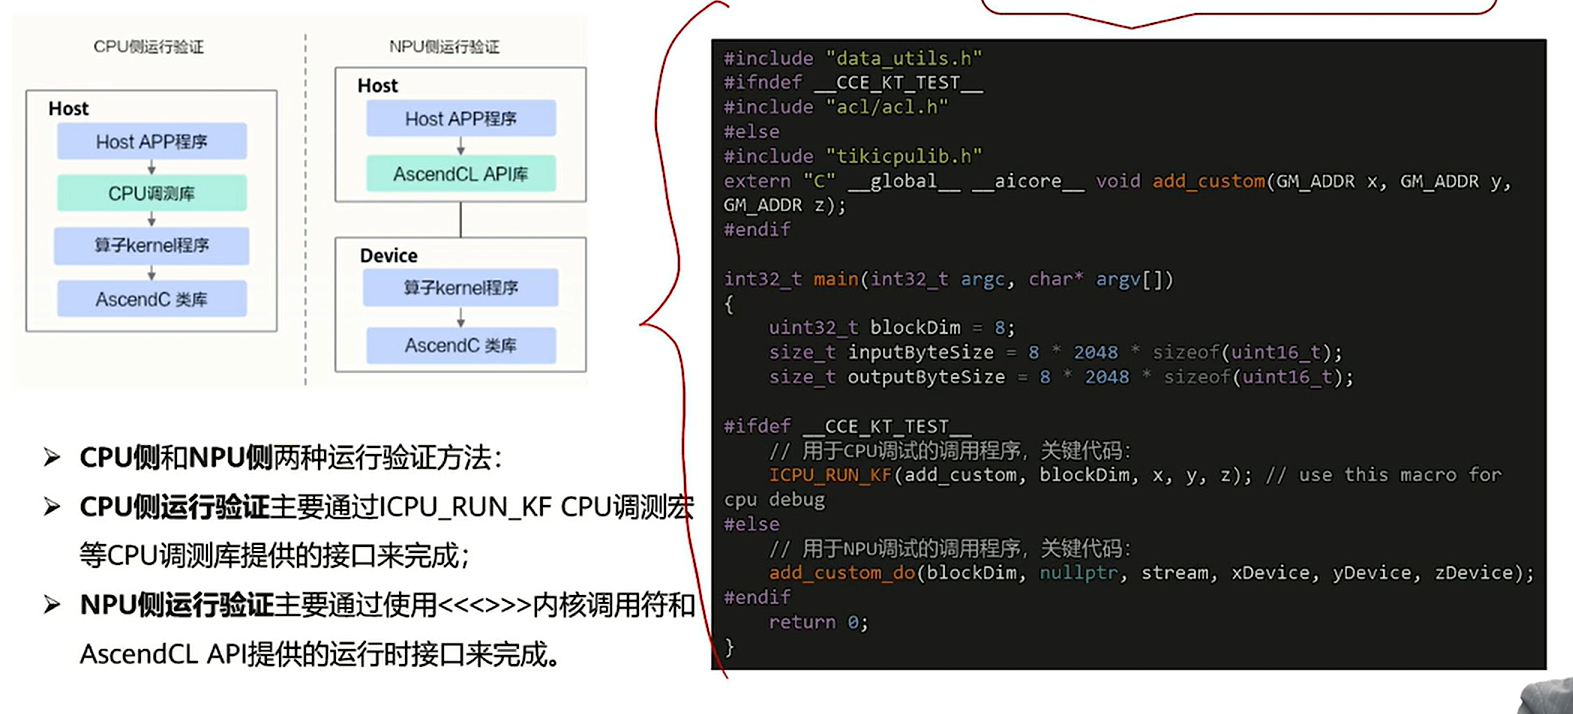
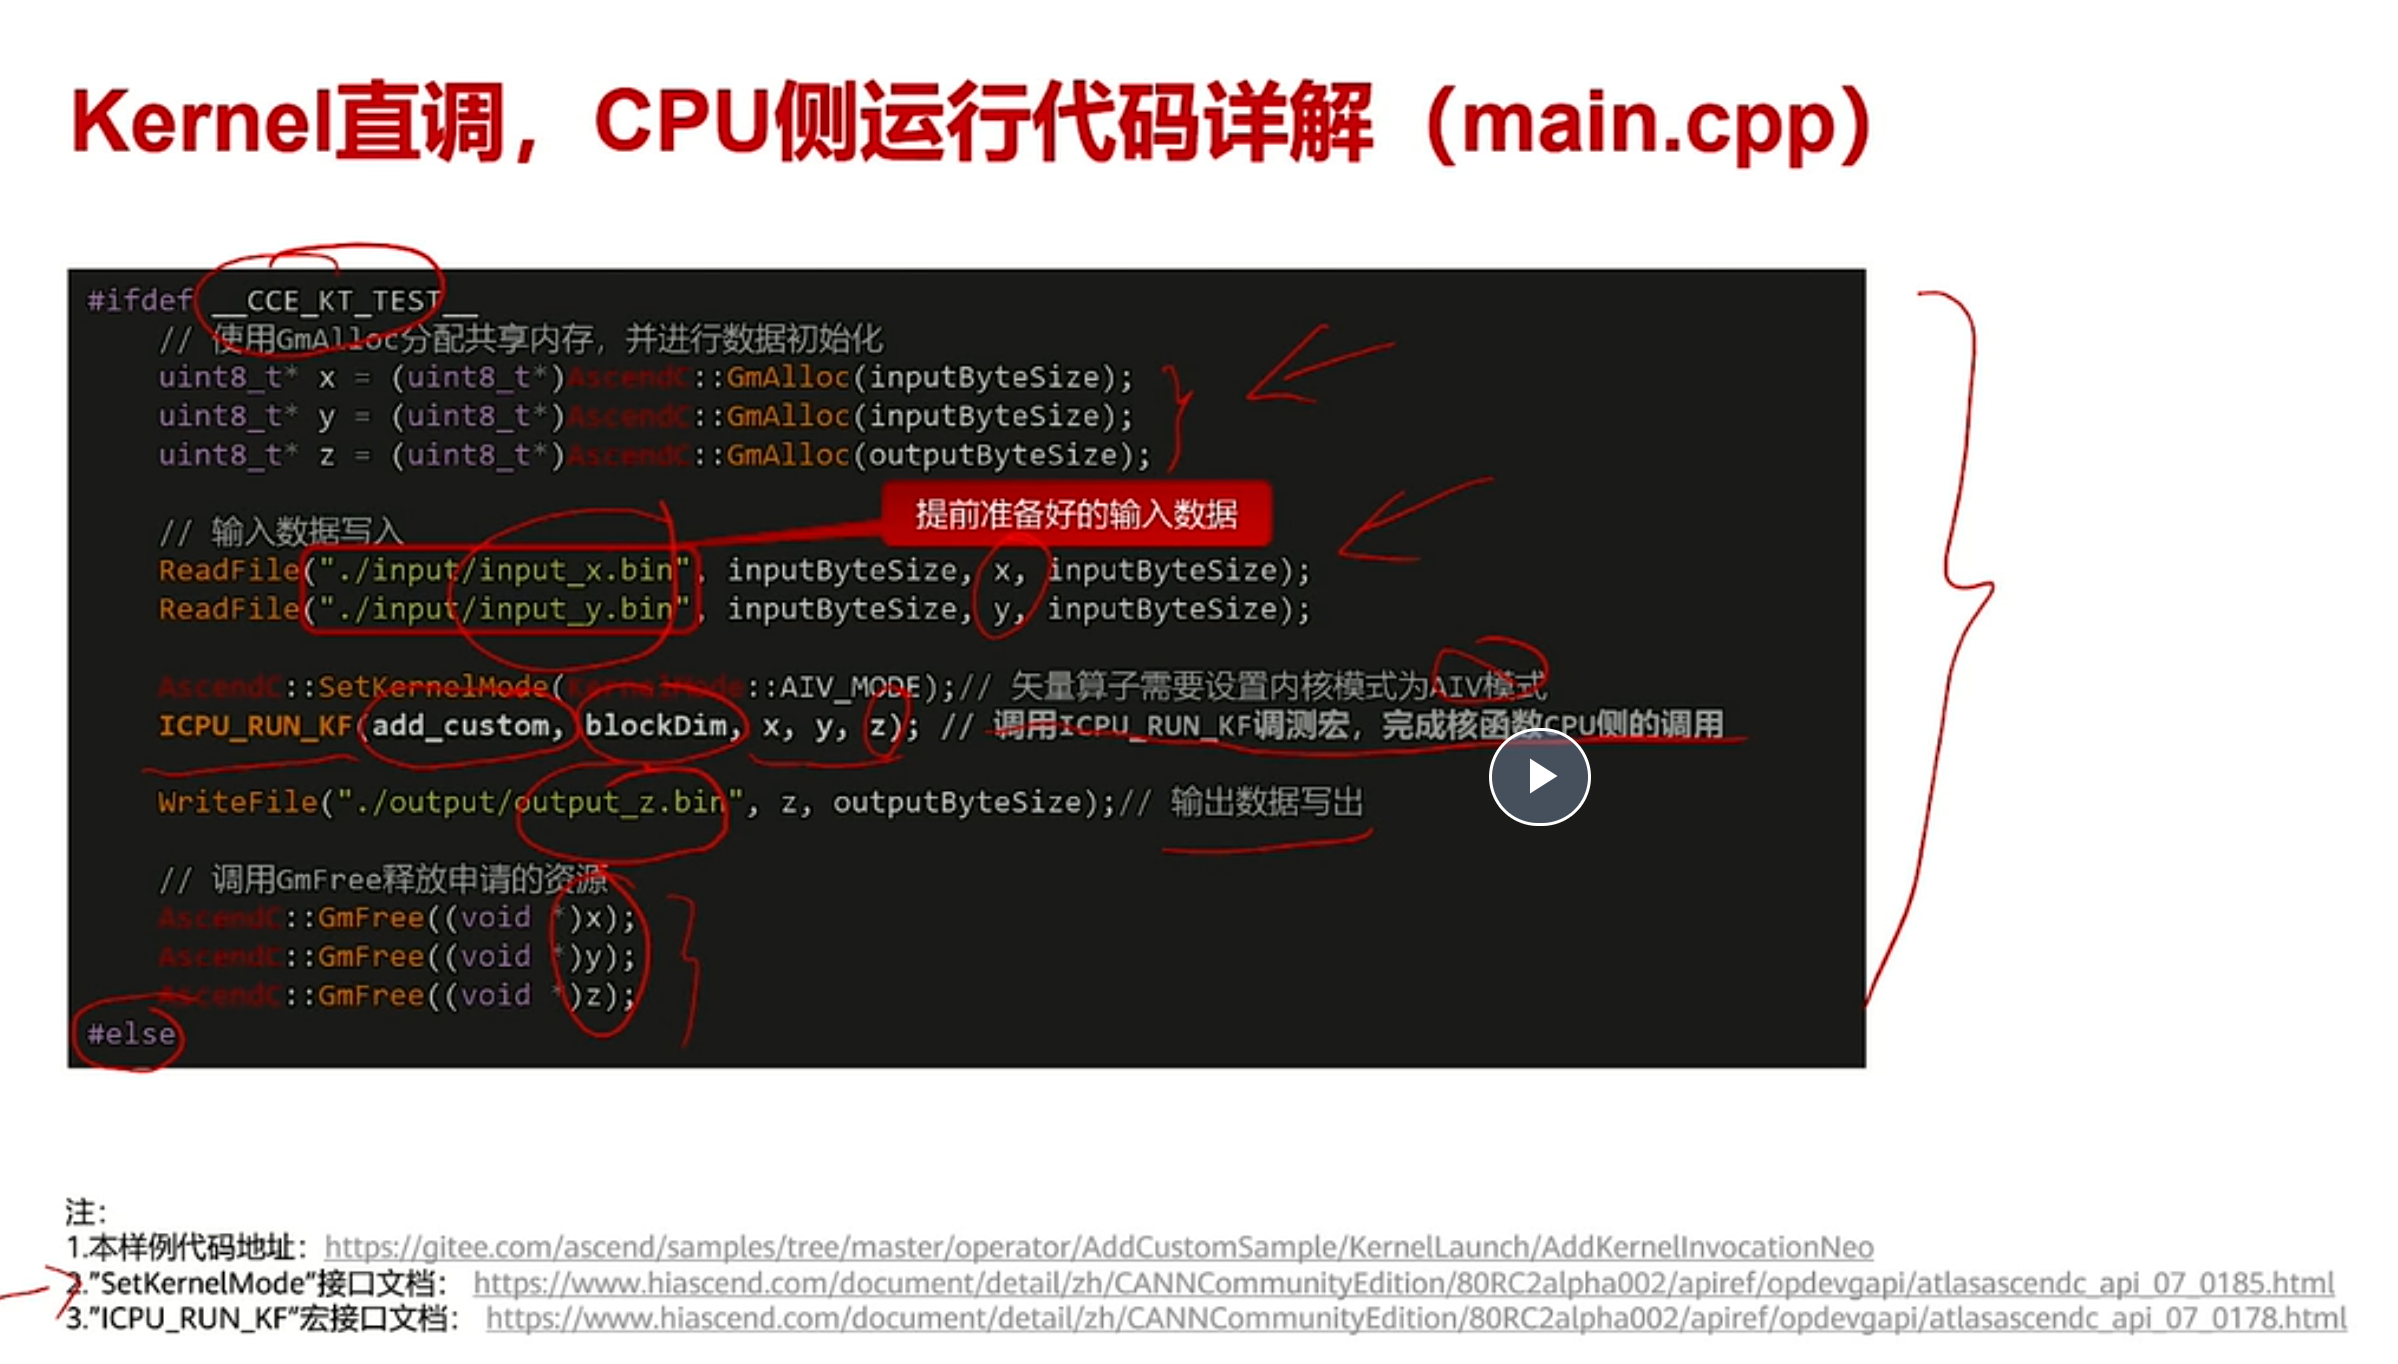
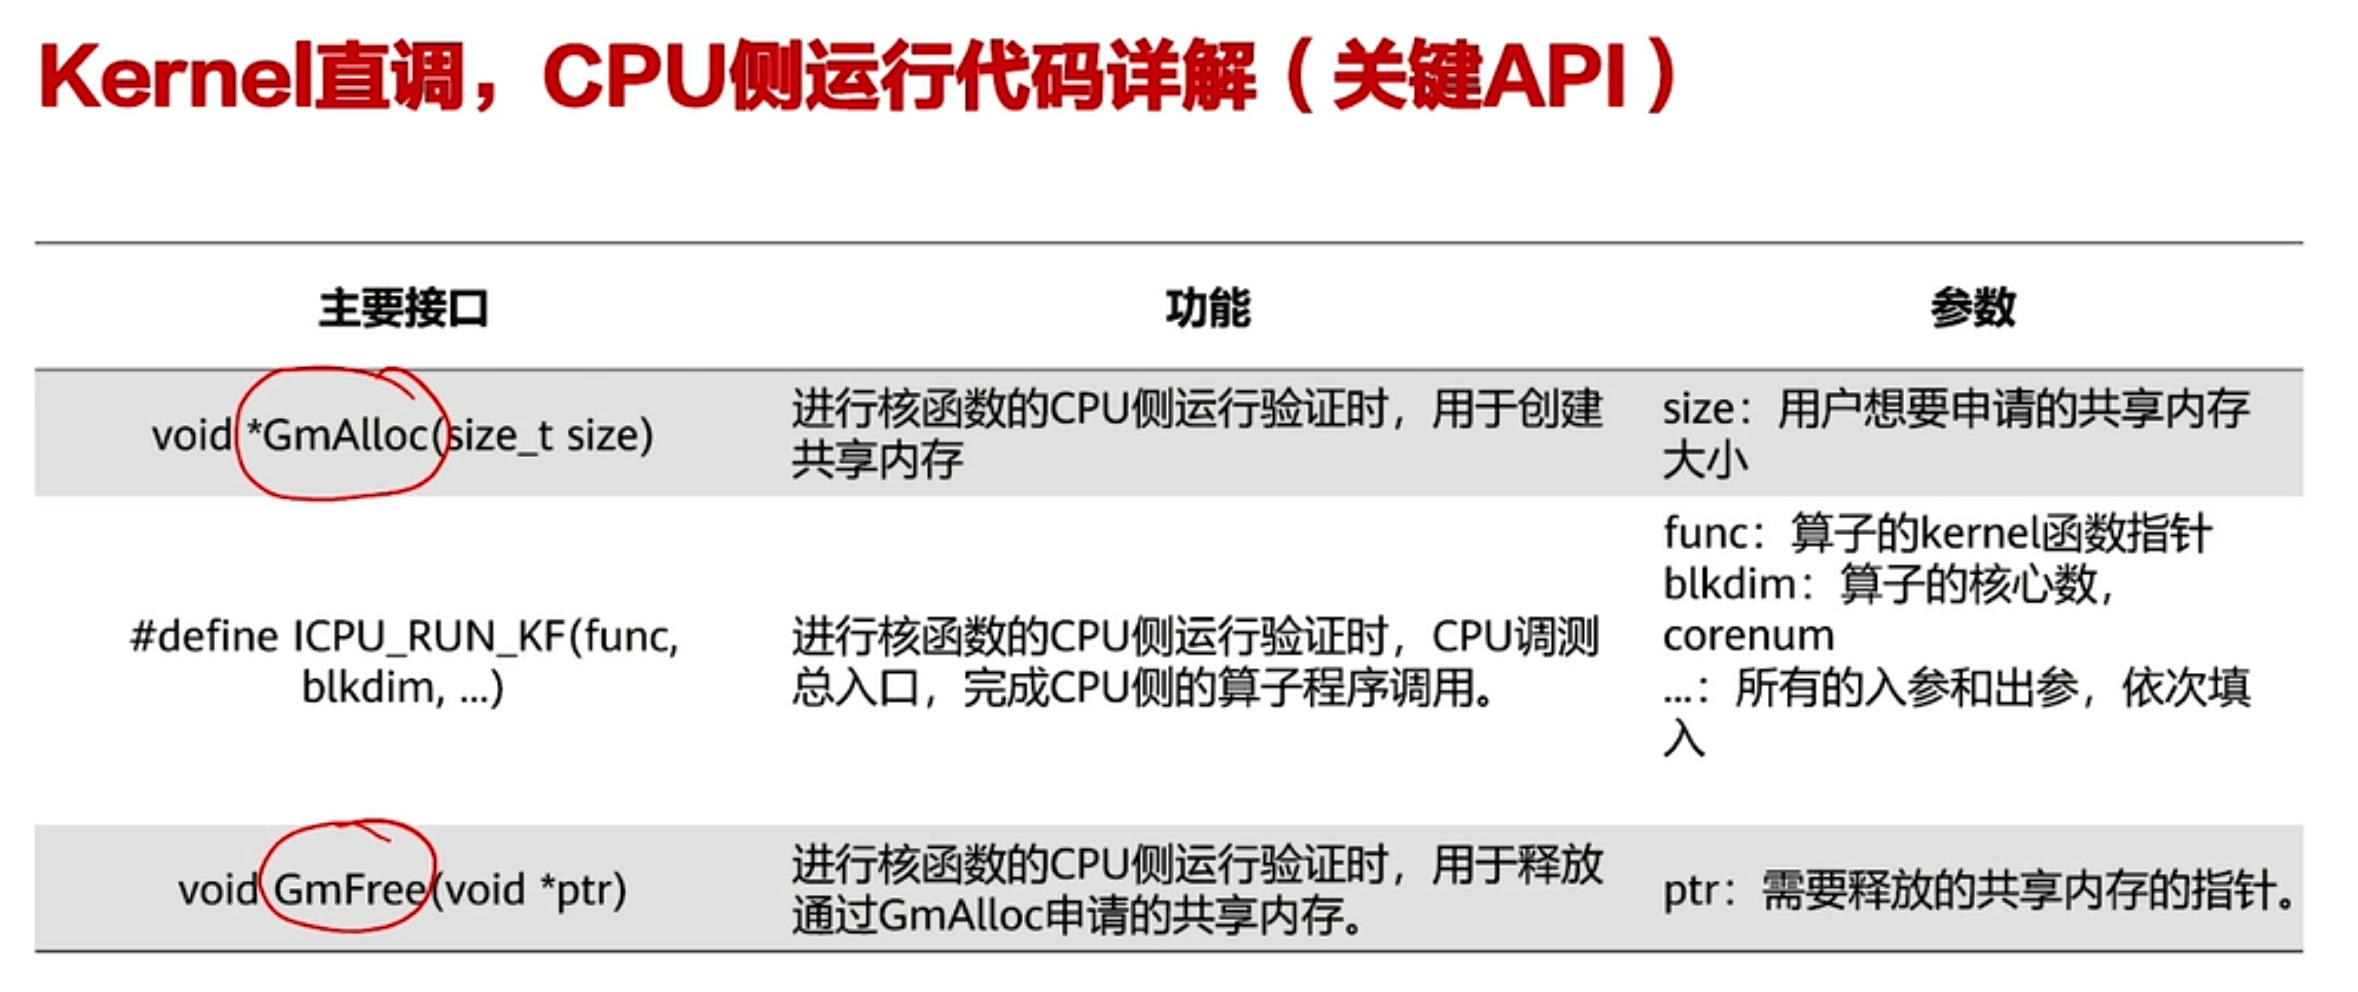
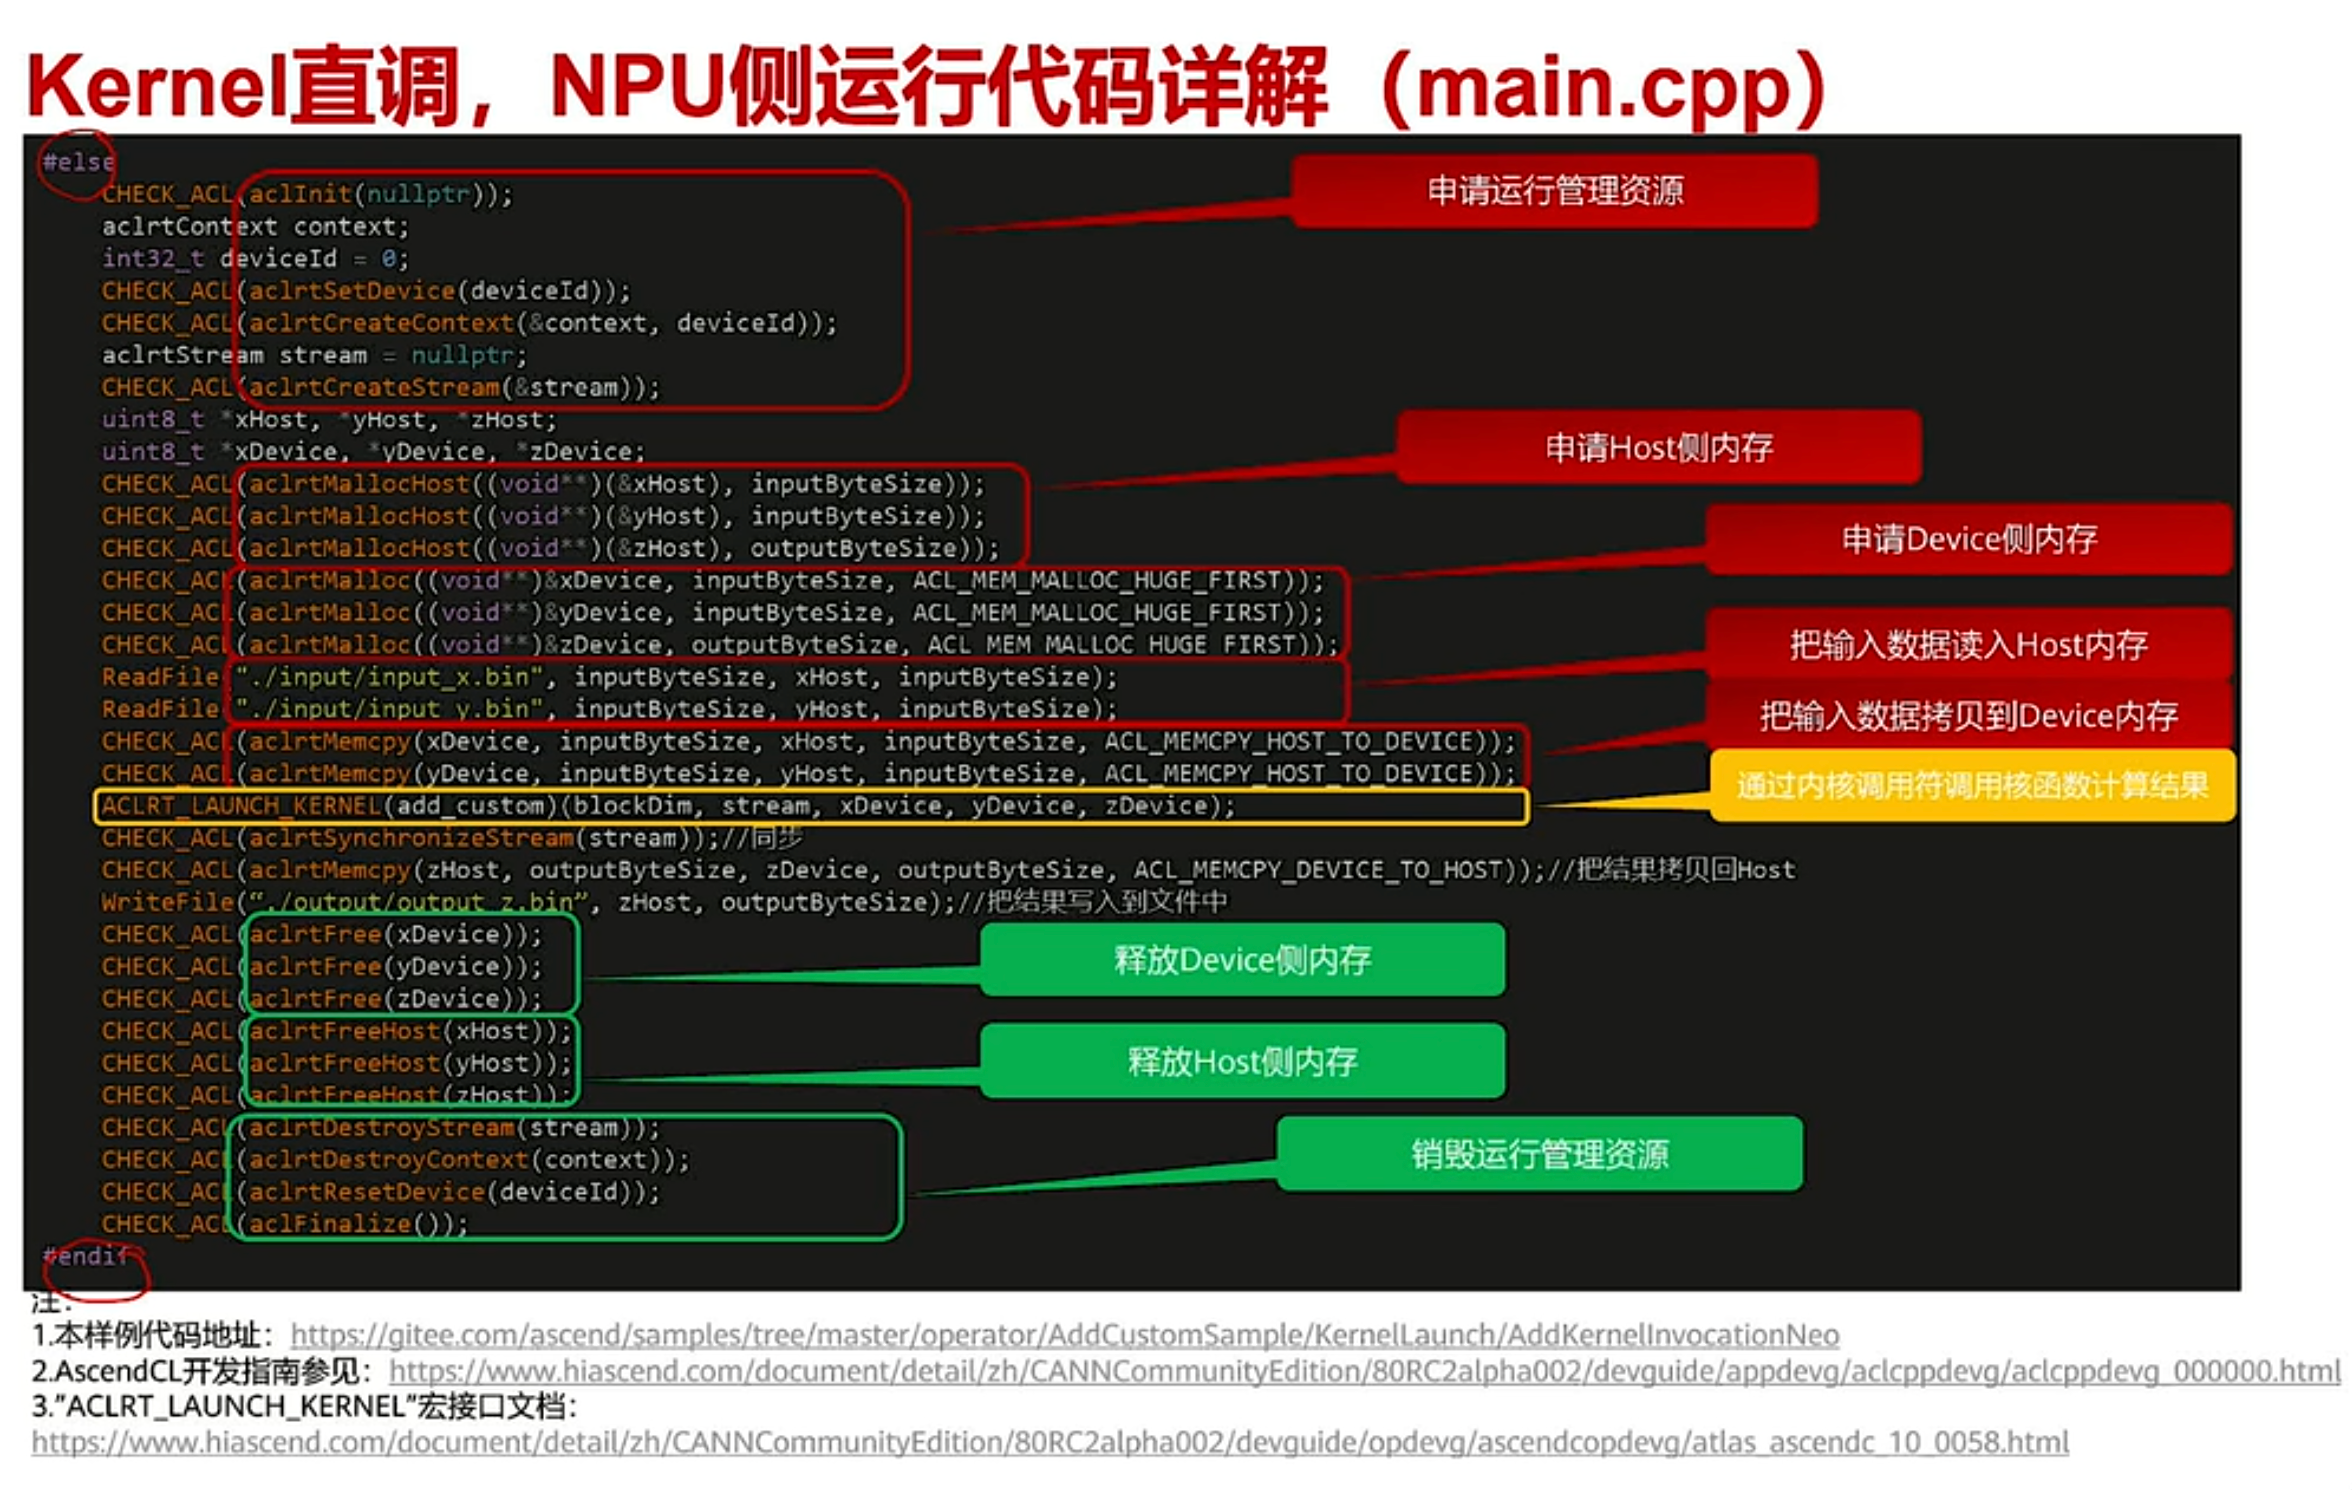
1. Kernel 直调
1.1 CPU侧
1.2 NPU侧

昇腾计算产业是基于昇腾系列(HUAWEI Ascend)处理器和基础软件构建的全栈 AI计算基础设施、行业应用及服务,https://devpress.csdn.net/organization/setting/general/146749包括昇腾系列处理器、系列硬件、CANN、AI计算框架、应用使能、开发工具链、管理运维工具、行业应用及服务等全产业链
更多推荐

 3
3 0
0- 0


 已为社区贡献3条内容

所有评论(0)